Showing posts with label bacon. Show all posts
Monday, January 2, 2012
Bacon-Wrapped Brown Sugar Pork Loin
Yes, I'm still alive. I may look like a zombie, but I'm still here!
The two week break between quarters was seriously just what this girl needed. I thought I would have a post up before the new year, but I took time to relax instead. Priorities, I tell ya.
And I'm proud to report that after the first quarter of culinary school, this girl has a solid 4.0. Woop woop! Right?!
Anyway, next quarter starts tomorrow and I'm ready for it. Purchasing, Sanitation, and Culinary Theory Lab Part 2 here I come!
I thought I'd start 2012 off with a bang and give ya something juicy, mouth-watering, and simple as can be. Pork-wrapped pork. Mmmm hmmm.
Ingredients:
Adapted from The Comfort of Cooking's Recipe
3 lb. bone-in pork loin
5-6 pieces of bacon
1/2 teaspoon chili powder
1/4 teaspoon hot Spanish paprika
1 teaspoon salt
1/4 teaspoon black pepper
1/4 teaspoon cumin
1/2 teaspoon cinnamon
Glaze:
1/2 cup dark brown sugar
1 tablespoon flour
1 tablespoon apple cider vinegar
1/4 teaspoon mustard powder
Why bone-in? Honestly, I think more flavor develops with a bone-in anything. Yeah, it may have to cook a tad bit longer, but flavor outweighs times in my book (this coming from a girl who swears she has no time to spare!).
So let's line a roasting pan with aluminum foil and place your big hunk of pork on that sucker. Preheat your oven to 375F.
In a small bowl, make your spice rub. Combine the salt, black pepper, paprika, cumin, cinnamon, and chili powder.
And give that pork a good rub down.
Then we'll wrap the whole thing in some bacon. P.S. - the technical term for wrapping something in fat (in this case, bacon) is "barding."
Place the roast in the oven and roast for about 50-60 minutes.
Meanwhile, in a small saucepan under medium heat, combine the ingredients for the glaze - the brown sugar, flour, cider vinegar, and mustard powder.
Simmer until the sugar is dissolved.
Drizzle glaze over top of pork roast and continue to roast for about 25-35 minutes longer, or until internal temperature has reached 160F.
The bacon will be nice and crispy!
Let rest for about 10 minutes and then slice into 1 inch thick portions. Serve with your starch of choice and enjoy!
I want to thank you guys for sticking with me, even though I've been M.I.A. I do my best to balance everything, but certain things take precedence before the blog. I appreciate you all, and again, thank you so much!
Until next time...
Tuesday, October 4, 2011
Fall Hash
Ahhh, did you miss me yesterday?
I'm here this morning, so that should make up for it right? I'm hoping that I can at least get you guys 3 posts a week, but we'll see. I don't want to make promises I can't keep!
Anyway, first week of culinary school was awesome! We got our whites on Saturday - check me out!
A natural, right?! C'mon, just entertain me for a minute.
I spent the first week basically feeling everything out. Seeing who was similar to me. Seeing who was not similar to me. It's definitely a lot to take in. But I'm jumping into it with both feet and absorbing all that is thrown at me! Next week, we get our knife kits (they're pretty bad ass if you ask me - I can practice "packing my knives and going" as if Padma, herself, was telling me. Okay, now I'm getting really dorky!)
Anyway, I figure since I'm posting in the morning, I might as well give you a solid breakfast dish! This is the second hash I've posted in the past couple weeks, so can you tell it's one of my favorite things to make? They're easy. They're versatile. They're darn delicious!
Ingredients:
1 medium acorn squash, peeled and cut into 1/2 inch cubes
4 slices thick-cut bacon, chopped
1 small onion, diced
salt & pepper, to taste
3 main ingredients? How could you not make this?!
Set a salted pot of water to boil under medium heat. Add acorn squash and boil just for a few minutes (maybe 4-5) to parboil. Drain and set aside.
Heat a large cast iron skillet under medium high heat. Add bacon and cook until crisp, about 5 minutes or so. Remove bacon with a slotted spoon and transfer to a paper towel-lined plate.
Remove all the bacon grease, except for about 1 to 2 tablespoons. Add onions to skillet and cook under medium heat until starting to soften, about 5-7 minutes. Add in acorn squash and cook until browned, about 5 minutes or so, and stirring occasionally. Stir in bacon and season with salt and pepper, if needed.
You could serve this as a side dish, or you can eat a whole plateful like I did! It's fall on a plate - I swear!
It'll probably be another day or so before I'm back, so until next time guys!
I'm here this morning, so that should make up for it right? I'm hoping that I can at least get you guys 3 posts a week, but we'll see. I don't want to make promises I can't keep!
Anyway, first week of culinary school was awesome! We got our whites on Saturday - check me out!
A natural, right?! C'mon, just entertain me for a minute.
I spent the first week basically feeling everything out. Seeing who was similar to me. Seeing who was not similar to me. It's definitely a lot to take in. But I'm jumping into it with both feet and absorbing all that is thrown at me! Next week, we get our knife kits (they're pretty bad ass if you ask me - I can practice "packing my knives and going" as if Padma, herself, was telling me. Okay, now I'm getting really dorky!)
Anyway, I figure since I'm posting in the morning, I might as well give you a solid breakfast dish! This is the second hash I've posted in the past couple weeks, so can you tell it's one of my favorite things to make? They're easy. They're versatile. They're darn delicious!
Ingredients:
1 medium acorn squash, peeled and cut into 1/2 inch cubes
4 slices thick-cut bacon, chopped
1 small onion, diced
salt & pepper, to taste
3 main ingredients? How could you not make this?!
Set a salted pot of water to boil under medium heat. Add acorn squash and boil just for a few minutes (maybe 4-5) to parboil. Drain and set aside.
Heat a large cast iron skillet under medium high heat. Add bacon and cook until crisp, about 5 minutes or so. Remove bacon with a slotted spoon and transfer to a paper towel-lined plate.
Remove all the bacon grease, except for about 1 to 2 tablespoons. Add onions to skillet and cook under medium heat until starting to soften, about 5-7 minutes. Add in acorn squash and cook until browned, about 5 minutes or so, and stirring occasionally. Stir in bacon and season with salt and pepper, if needed.
You could serve this as a side dish, or you can eat a whole plateful like I did! It's fall on a plate - I swear!
It'll probably be another day or so before I'm back, so until next time guys!
Friday, August 19, 2011
Chef Salad w/ Honey Mustard Dressing
Boy am I glad it's Friday! I don't really have big plans for the weekend (possibly the KY State Fair?), but the usual - relaxing.
Andy is going to be out tonight for a bachelor party, so that leaves me to fend for myself tonight for dinner. I work late, so I might just throw together some CSA vegetables and see what I come up with!
Salads are always my go-to lunch during the week, but every now and then you'll see them appear for dinner. I made this a while back, but it's still been in the back of my mind because it was one of the best and most filling salads I've ever had. The easy honey mustard dressing really makes this something special!
Ingredients:
Dressing:
1 tablespoon dijon mustard
1 tablespoon honey
3 tablespoons red wine vinegar
3 tablespoons olive oil
salt and pepper, to taste
1 tablespoon chopped dill
Salad:
Romaine Lettuce
1 Granny Smith apple, peeled and julienned
2 hard boiled eggs, chopped
3 pieces of bacon, cooked and chopped
shredded cheddar cheese
sliced turkey, chopped
1 carrot, peeled and chopped
I love the "Mason Jar" method when making salad dressings. What is that? Well, basically, throw in all of the ingredients for the dressing into a Mason Jar. Shake until mixed. Pour on top of salad. Easy? Hell yeah it is.
To assemble the salad, wash the lettuce and shake dry. Divide among plates and top with apple, eggs, bacon, cheese, turkey, and carrots. Drizzle on dressing.
And bam! Lunch or dinner is ready in no time.
I don't usually like honey mustard as anything other than a dipping sauce for chicken, but on top of this salad... it was amazing.
What's your favorite salad & dressing combo?
Have a great weekend guys!
Labels:
apple,
bacon,
dill,
eggs,
homemade dressings,
honey,
honey mustard,
lettuce,
louisville,
salads
Friday, August 12, 2011
Sweet Chili Green Beans
I'm so ready for the weekend (I've got to work Saturday morning, but it ain't no thang!). We've got a couples bridal shower to go to, so that should be fun. And then some major relaxation is in the works for Sunday and Monday!
Now I used to think I had a favorite green bean recipe. I mean, it's all the rage on Food52, too. But my friends, I think there's a new contender in town. This was so good I ate it with my hands. Yeah... that good. So good, if I ever do open up my own restaurant - this will be an appetizer for sure.
Ingredients:
1 lb. green beans, trimmed
4 strips of bacon, chopped
1 onion, thinly sliced
1-inch piece of ginger, peeled and minced
3 thai chiles, minced
2 tablespoons sweet chili sauce
1 teaspoon fish sauce
1/4 c. water
sesame oil, optional
toasted black sesame seeds, optional
Bring a large pot of salted water to a boil. Add green beans and cook for about 3 minutes, or until beans are a bright green. Drain and set aside.
In a large skillet over medium to medium high heat, cook the bacon until crisp, about 5 to 8 minutes. Drain on paper towel-lined plate and set aside. Remove all but 1 tablespoon of the bacon grease from the pan and add onion. Cook until softened, about 3 to 5 minutes.
Stir in the ginger, Thai chiles, sweet chili sauce, fish sauce, and water. Add green beans and toss to coat. Saute for 5-10 minutes, until water evaporates, the sauce thickens, and the beans become tender.
Stir in bacon and sprinkle with sesame oil and sesame seeds.
Seriously, I couldn't stop eating this. I'd walk by and grab a bean. Then come back 2 seconds later and grab another couple. Be prepared to have an addiction to these!
Have a great weekend guys!
Wednesday, June 8, 2011
Broccoli Salad
I have a secret. I claim to dislike mayonnaise or Miracle Whip, or anything resembling the two. And honestly, I really do dislike those condiments - the majority of the time.
But then there's other times. Times where I want to make broccoli salad, where I secretly embrace mayo and forget that we have such a tumultuous love-hate relationship.
And don't even get me started on broccoli salad. I used to think that it was something just old (no offense!) people ate. I mean, really? Broccoli salad? It was just weird.
But then I became a food blogger. And being a food blogger, I'm practically obsessed with searching through random blogs and broadening my horizons. And so we come full circle to broccoli salad. And mayo. And I'm jumping in head first... because seriously. This is one of the best side dishes I've made all year. Yeah. THAT good.
This post was entered in the event “Get Grillin’ with Family Fresh Cooking and Cookin’ Canuck, sponsored by Ile de France Cheese, Rösle, Emile Henry, Rouxbe and ManPans.
Ingredients:
1 medium head of broccoli, chopped
1/2 red bell pepper, seeded and chopped
1 small red onion, thinly sliced
1/4 cup golden raisins
1/8 cup sunflower seeds
4 slices of bacon, cooked and chopped
1/2 cup Miracle Whip/Mayo (I used MW because we didn't have any mayo)
1/8 to 1/4 cup sugar (Use less sugar if using MW because it's sweeter than mayo)
2 tablespoons apple cider vinegar
In a large bowl, combine the broccoli, onion, raisins, sunflower seeds, and bacon. Mix well.
In a small bowl, combine the Miracle Whip (or mayo), sugar, and vinegar until smooth.
Pour Miracle Whip/mayo mixture over broccoli and toss until coated well.
Now, I made the mistake of saying Miracle Whip was the same thing as mayo once... and Andy promptly corrected me. I didn't know he was the mayo police, but he argued his point and I suppose I can agree (but don't tell him that he's right!). Either can be used in this recipe though, and I must say, I'm partial to the Miracle Whip version.
Either way, like I said... this is the best side dish I've made all year. And to think that 48 hours ago I scoffed at broccoli salad. Never again!
And don't forget, tomorrow is Thursday - which means I'll be doing a CSA round up... so if you want your CSA pics featured, don't forget to e-mail them to me @ mtlabor85 (at) yahoo (dot) com!
See you guys tomorrow!
Wednesday, May 4, 2011
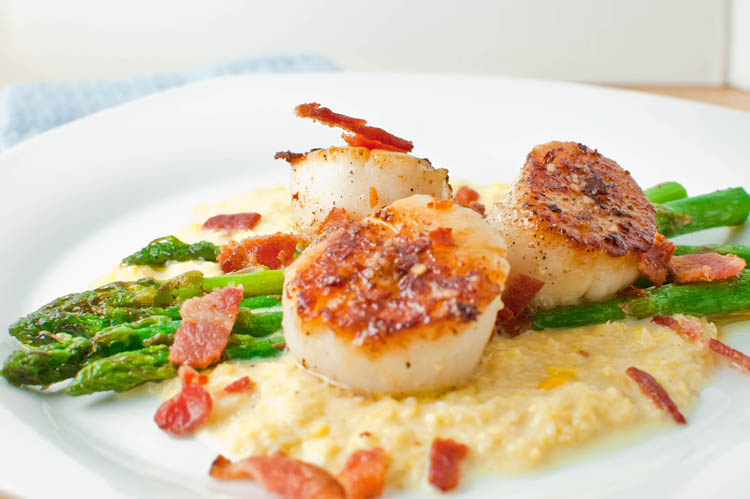
Seared Scallops w/ Creamed Corn & Asparagus
Happy Wednesday everybody! I just got home from picking up our first CSA of the year! The rain really did a number on the farms because we didn't get as big of a share as they had hoped for us to get - but hey, I'm happy with anything! We ended up with a bunch of mixed greens, scallions, lettuce, and a few strawberries. They also subbed in some canned stuff due to the lack of actual produce - pumpkin butter (can we say yum?!), garden salsa, and soy sauce - all locally made of course!
What's also great about today is the sun is shining! No rain (with the exception of a few sprinkles this morning) all day! Hallelujah!
Anyway, this past Sunday was slim pickins in the house. Well, I wanted to experiment and test my abilities with what we already had, anyway. We had just went to the grocery on Saturday and I picked up some scallops from Whole Foods, not really knowing what I wanted to do with them yet. Andy just so happened to get some corn and asparagus, so the dish just came together naturally. After checking my handy dandy Flavor Bible (best resource ever!), all of those components were a go! Don't you just love when a meal comes together like that?
Ingredients:
6 sea scallops
salt and pepper, to taste
1 tablespoon olive oil
1 large corn on the cob
1 to 2 tablespoons of whole milk
1/4 teaspoon cayenne pepper
1 bay leaf
about 10 stalks of asparagus
1 tablespoon butter
4 strips of bacon
Preheat oven to 400 F.
Line a baking sheet with aluminum foil and spray with non-stick cooking spray. Place bacon atop foil and bake for about 10 to 15 minutes, or until browned and crisp. Place on paper towel-lined plate to dry, then chop into small pieces.
Heat a small saucepan under medium high heat and add butter and bay leaf.
Cut corn from the cob and place in saucepan. Cook for about 10 minutes or so, until corn has slightly softened. Season with cayenne pepper and salt. Add in milk and heat for about 2-3 minutes.
Remove bay leaf and puree corn with an immersion blender, adding more milk if needed, until you reach your desired consistency. I like my creamed corn slightly chunky, but smooth at the same time. Heat on low to keep warm while you make the asparagus and scallops.
Heat a large skillet under medium high heat and add olive oil. Add asparagus spears and saute for about 5 minutes, or until bright green and still slightly crisp. Remove from pan with tongs and set aside.
In same skillet, add more olive oil, if needed and bring heat up just a tad. Season scallops with salt and pepper and add to skillet. Cook for about 2 & 1/2 minutes per side, or until nicely browned. You don't want to overcook them because they'll still continue to cook after you take them out of the pan.
To plate, add a good amount of creamed corn to form a base. Then place about 5 asparagus spears on each plate. Arrange scallops on or around asparagus and garnish with bacon (not a crucial step, but definitely one I wouldn't want to skip, hehe).
I loved how so many different textures were going on here. The smoothness of the corn, the crunch of the asparagus, the delicate scallop. It was perfect! This was definitely something I could see myself eating at an elegant restaurant (hey, maybe it'll be a dish in my restaurant one day??? - a girl can dream, right?). It was fresh, flavorful, and definitely hit the spot in a hurry!
Well, I'm off to go play some volleyball (can we say undefeated for the season so far? Hopefully I didn't just jinx us!) Have a great rest of your Wednesday guys! And stay tuned tomorrow for some pics of our first CSA pick-up!
Labels:
asaparagus,
bacon,
creamed corn,
csa,
dinner party,
easy,
elegant,
louisville,
scallops,
seafood
Friday, April 29, 2011
Spicy Fried Rice w/ Chorizo
Happy Friday guys! I am so elated that it's rearing up to be the weekend, that it's not even funny. We've got a pretty jam-packed weekend planned, actually.
Tomorrow morning is the Derby Marathon & Mini. And no. My butt is not running in it. I'm not that in shape yet. I'll actually be volunteering at one of the Powerade and water stations (mile marker 10/19 for those of you that are actually running!). The only bad thing about this is... I have to be there at 6:15am. SIX. FIFTEEN. In the morning. On a Saturday. Yeah. I'm dedicated to giving the runners their fluids.
But it won't be so bad. I've been on a volunteering kick lately, so it'll be good to get out there and do some good. (And I get a free t-shirt, so that's always a plus!)
And there's also a free concert (that was supposed to be by the river, but considering Waterfront Park looks pretty much like Atlantis right now, I'm positive that they'll be relocating that) on Saturday night that we plan on going to with a couple friends. The band? Soul Asylum. Yeah, anybody remember that early 90's band? Most famous for that song "Runaway Train". Yeah, I was 7 when that came out, so no, I don't really remember that band... but since Andy is a tad bit older than I am, he remembers them clearly. Which is also funny because he can't ever remember to take out the trash on Mondays, but yet, remembers a band from ages ago. But I digress.
Anyway, let's talk fried rice. Fried rice is one of those things that I believe my mom can make the best. She always just added in whatever we had laying around the house, and it was always amazing. Definitely great for dinner all on it's own. But I'm not bragging.
What I will be bragging about, is this new recipe for fried rice that may give my mom's many versions a run for her money. It's spicy, it's filling, it's absolutely delicious. So go ahead, try it out - you won't be disappointed!
Ingredients:
Adapted from PigPigCorner's recipe
2-3 cups leftover cooked rice (cold and day old is usually best)
1 tablespoon unsalted butter, melted
4 pieces of bacon, chopped
1 small onion, diced
3 cloves of garlic, minced
2 scallions (green parts only), chopped
1 large cooked chorizo sausage (or whatever meat/protein you want to add - I just had some leftover), chopped
2 tablespoons Sriracha, or other hot sauce
1 tablespoon sugar
1 tablespoon hot water
1 tablespoon sesame oil
Soy sauce, to taste
3 eggs
In a medium bowl, mix leftover rice with the melted butter and set aside.
In a small bowl, mix together Sriracha, sugar, and hot water. Set aside.
In a large skillet under medium high heat, fry up the bacon pieces until browned and crisp, about 6-8 minutes. Remove with a slotted spoon and transfer to a paper towel-lined plate. Set aside.
Drain pan of the bacon fat, leaving about 1-2 tablespoons still in the pan. Add the diced onions and cook until softened, about 5 minutes.
Stir in garlic and half of the scallions. Saute for about a minute more.
Add rice to the pan and pour Sriracha mixture over top. Mix well. Stir fry for about 3-5 minutes, or until rice is started to "crisp" or brown.
Crack the eggs over the rice and stir to scramble throughout mixture. Cook for an additional 2-3 minutes, stirring often.
Stir in bacon pieces and chorizo.
Season mixture with soy sauce, I think I used maybe 2-3 tablespoons and it was perfect.
Stir in sesame oil and remaining scallions. Serve hot and with extra Sriracha if you'd like!
This was seriously delicious. We had this with some Red Curry Chicken Wings (recipe soon to come!) and it couldn't have been a better meal. The best part? We had a good amount of leftovers, and after making this on Tuesday, they're practically almost gone. It's almost bittersweet... but then again, I could always just make some more!
How do you guys fix your fried rice? Leftovers are always useful!
Hope you all have a great weekend and look forward to a new recipe on Monday!
Labels:
bacon,
chorizo,
eggs,
fried rice,
leftovers,
louisville,
quick,
rice,
soy sauce,
sriracha
Wednesday, March 30, 2011
Spinach & Bacon Salad
Andy and I have been on a little health-kick lately. We've been over-indulging a little too much, and our bodies are retaliating. So in order to pay homage to our bodies, we're eating better. Everything in moderation right?
What I love about this salad is that it's absolutely beautiful. It's simple. It's colorful. It's downright mesmerizing. And that's before you even have a bite.
The tangy vinaigrette offers a bright awakening of the senses and goes perfectly with the fresh, colorful vegetables. Needless to say, our bodies loved us for this.
* This post has been entered as part of Denny's & Foodbuzz's BACONALIA challenge for a chance to win.
Ingredients:
2-4 cups baby spinach, washed
1 cup red cabbage, shredded/sliced thinly
2 large carrots, peeled and sliced
1/3 cup apple cider vinegar
1/4 cup maple syrup
1 tablespoon Dijon mustard
salt and pepper, to taste
4 slices of bacon
In a large bowl, toss the spinach, cabbage, and carrots until mixed.
In a small bowl, whisk together the vinegar, maple syrup, and Dijon mustard. Season with salt and pepper, to taste.
Heat large skillet under medium high heat and fry up the bacon until crisp, about 5-8 minutes. Drain on a paper towel-lined plate and roughly chop into small pieces.
Divide vegetables among two plates and top with bacon pieces. Drizzle vinaigrette over top and dig in!
You definitely won't regret this. Andy said he loved this salad, and even said that we need to start eating more of this type of salad. I've got no complaints there! I mean, this is practically ready in about 15 minutes or less! And it was super tasty!
I'm off to a bookclub meeting with my girls - this month's book was The Other Boleyn Girl. Definitely a good one! Have you read it? What are you guys currently reading?
Wednesday, March 16, 2011
Pot Roast w/ Red Wine Gravy
![]() |
| Served piping hot! |
And before you guys gather together and hold an intervention in my honor, I didn't drink all of the wine in those bottles. My friends did. Hehe.
But besides empty wine bottles, I also have a bunch of almost full ones in our bar area. Lots of half-drunk red wine bottles. I'm a white wine drinker, myself. I don't mind red wine, but it's just not my preference. So I end up opening them, drinking a glass, and forgetting about them.
So what to do with all of that red wine? Hmm, I cook practically 7 days a week, so why not use them in some dinners! Why was is not that obvious before? Yeah, sometimes the things you need are right in front of you. First thing I thought of to use that red wine was pot roast! Red meat and red wine just can't be beat.
Ingredients:
2 lb. beef chuck roast
1 tablespoon olive oil
1 & 1/2 cups red wine (I used a Merlot)
2 & 1/2 cups beef stock
1 large onion, sliced
8 oz. sliced mushrooms
10 slices of bacon, chopped
1/2 cup flour
salt and pepper, to taste
1 teaspoon onion powder
1 teaspoon garlic powder
1/2 teaspoon thyme
1/4 teaspoon cayenne pepper
Place roast in a large plastic bag and pour red wine in with it. Seal bag tightly and let marinate in fridge for about 3 hours.
Remove roast from bag and pat dry, reserving the wine.
Plug in your crockpot and turn it to the high setting. Pour beef stock, sliced onions, and mushrooms into crockpot.
In a large skillet, heat 1 tablespoon of olive oil under medium high heat. Add roast and sear, about 2-3 minutes per side. Remove roast from pan and set aside on a plate.
In same skillet, add chopped bacon and fry for about 8-10 minutes, or until bacon is browned. Remove bacon from skillet with a slotted spoon and dry on a paper towel-lined plate. Once dry, add bacon to crockpot.
Stir in flour, onion powder, garlic powder, and cayenne pepper to liquid in crockpot. Mix until flour is dissolved and no clumps are present. Add roast to crockpot and pour remaining red wine from marinade over top. Sprinkle thyme over roast and season with salt and pepper, if desired.
Let cook in crockpot for about 6 to 8 hours, or until roast is tender and falls apart when cut with a fork. Serve with mashed potatoes or other comforting side dish.
This was one flavorful gravy. And you all remember my love for gravy right? Andy loved this too. He's not normally one for leftovers, but he made sure he had some set aside for his lunch today. This isn't traditionally Irish or anything, but it could definitely sub in for a comforting St. Patty's Day meal! Enjoy your Wednesday guys!
Labels:
bacon,
beef,
crockpot,
louisville,
merlot,
onions,
pot roast,
red wine,
roast,
slow cooking
Friday, February 18, 2011
Valentine's Day Cheeseburger Pizza
Yes, I know. It's well past Valentine's Day. I just couldn't help but share with you guys what I made for Andy on Valentine's Day.
And some of you may turn your nose up to some of the ingredients... well, one in particular - Velveeta. Yes, I know, it's not real cheese. But to Andy. It is real cheese. In fact, he thinks it's the best cheese. While we don't obviously share the same opinion regarding this, Valentine's Day is a day of love. And because I love that man, regardless of his food and cheese preferences, I set my food snobbishness (or well, real sensibility, hehe) aside, and made this heart-shaped pizza for him using one of his favorite things... Velveeta.
Hope you guys have a great weekend, and I promise to post those Nutella cupcakes next week!
Ingredients:
Adapted from a Taste of Home recipe
2 cups bread flour
2 tablespoons sugar
1 & 1/2 tablespoons active dry yeast
1 & 1/2 teaspoons salt
3/4 cup warm water
2 tablespoons olive oil
1 lb. meatballs, about 10-15 (you can use homemade or frozen - just make sure to defrost them a little if they're frozen), chopped
3 garlic cloves, minced
salt and pepper, to taste
1 cup Pecorino-Romano cheese, grated
1/2 cup homemade tomato soup, or sauce (I made a tomato soup recently that had a pizza sauce taste, so I used that)
1/2 onion, sliced
4 strips bacon, cooked and chopped
1/2 cup Velveeta cheese, chopped
1/2 cup pepperjack cheese, shredded
Start by making the crust. In a large bowl, combine the bread flour, sugar, yeast, and salt. Add the warm water and oil. Mix until the dough is smooth. Add additional flour if dough is still sticky.
Knead on a floured surface for about 5 minutes or until dough becomes elastic and smooth. Cover with a warm damp towel and let rise for about 10-15 minutes.
In a large skillet, cook the chopped meatballs and garlic. Season with salt and peppper, if desired.
Preheat oven to 450 F.
On a floured surface, roll out the dough into a large circle, about 1/4 inch thick. Or if you like a thicker crust, you can always make a smaller circle. If you want to be cutesy like me, you can make the circle into a heart shape, but it's not necessary.
Roll the edges slightly to form a thicker outer edge. Poke the dough with a fork.
Place crust on a greased baking stone or baking sheet. Bake for about 7-10 minutes, or until crust is slightly browned.
Sprinkle the crust with the pecorino cheese and top with tomato sauce/soup. Add meatball/garlic mixture, onion, chopped bacon, and Velveeta and pepperjack.
Bake the pizza for about 15-20 minutes or until cheese is melted and golden. Slice and serve.
Seriously. This was a 'man' pizza. Andy said he liked it a lot. I could give or take on it. We both agreed that the crust was different and unusual. Not something you associate a pizza crust with being, but it was pretty tasty. The toppings, of course, could be alternated to suit your tastes. This was a winner in Andy's book, and seriously, that's all that mattered to me. =)
So have a great weekend guys and I'll see you back on Monday!
Wednesday, February 2, 2011
Mexican BLTs
![]() |
| I didn't say it wasn't messy. |
So the other day, I came home to a box from Foodbuzz. Inside was some Pace Picante Sauce, thanks to Foodbuzz's Tastemakers program. I'll be honest, I don't usually buy salsa at the grocery. I prefer mine chunky and fresh. But Pace is different. It reminds me of being at a Mexican restaurant. The salsa is usually thin and packs some heat.
I pondered what I would make with the sauce. Should I stick with a Mexican theme since it made me nostalgic? Or should I go a different route? If you know me, I don't like to go with the obvious, so of course, I had to do something out of the box. And so ties in my love for sandwiches. BLT's in particular.
Ingredients:
Adapted from Mommy Cooks!'s recipe
Fresh baked bread, sliced
olive oil
pinch of cumin powder
pinch of chipotle chili powder
8 slices of thick-cut bacon
1/3 cup mayonnaise
1/4 cup Pace Picante Sauce
1 poblano pepper, seeded and chopped
1/2 cup shredded pepper jack cheese
1/2 cup romaine lettuce, chopped
1 tomato, sliced
Preheat oven to 400 F.
Place bacon a rack over a baking sheet and bake until crisp, about 15-20 minutes. Drain on a paper towel-lined plate and set aside.
Brush the olive oil over the top of the pieces of bread. Sprinkle cumin and chipotle chili powder over top of bread slices.
In a small bowl, mix together the mayonnaise, Pace Picante sauce, and the chopped poblano pepper.
Spread the mixture over the top of your bread slices.
Top bread slices with pepper jack cheese (you can do one slice if you want, but I like the cheese coming at me from both ends!)
Place the bread slices on a baking sheet and bake for about 5-7 minutes, or until cheese is nice and melted. You could always broil it also if you want the cheese to brown and crunch up a bit.
My bacon slices were pretty long so I just snapped them in half. Place about 4-6 pieces of bacon (and of course, you could get buck wild and go with more if you're so inclined) on top of one slice of bread. Top with a tomato slice and finally some romaine lettuce. Close sandwich with another slice of bread.
This was one hell of a BLT. It comes mighty close to beating my ultimate favorite BLATE (Bacon, Lettuce, Avocado, Tomato, Egg - of the poached variety, of course). I loved the salsa/mayo mixture, which is odd because I usually stray away from mayo at all costs. This was new to me, this was fresh, and it was a different way to use up some Pace Picante! Definitely give it a go if you're in the mood for a delicious BLT!
* The Pace Picante Sauce was provided to me by Foodbuzz's Tastemakers program and no additional compensation was given. The opinions of this post are strictly my own.
* This post was also entered to take part in Foodbuzz & Denny's BACONALIA challenge for a chance to win.
Wednesday, July 21, 2010
Salmon BLT's

Sometimes the simplest things in life are some of the best. I have this ongoing suspicion that the city of Louisville is against me and finding trout. Every time I set out to cook trout for dinner, I can't find it anywhere. Not at Whole Foods, not at Kroger, not anywhere! And so yesterday was no exception, but we decided to with some Sockeye Salmon instead. And honestly, I think it was meant to be. Because these sandwiches were delicious, simple, and made me forget all about my trout woes. And plus, I'm on vacation so I couldn't stress about it too much!
Ingredients:
Adapted from Food & Wine's June 2010 issue - "Grilled-Trout BLT"
4 slices of whole wheat bread, toasted
2 6 oz. salmon fillets, skin on
3 scallions, roughly chopped
1/2 tablespoon capers
small handful italian parsley, chopped
juice from 1 lemon
zest from 1 lemon
3/4 cup mayonnaise
salt and pepper to taste
olive oil
6 slices habanero bacon (this was apparently a quick seller at Whole Foods and I HIGHLY recommend it if it's available), cooked
2 thick slices of tomato
2 large leaves of lettuce
Start by making your lemon-caper mayo. In a bowl of a food processor, combine scallions, capers, parsley, lemon juice, lemon zest, and mayonnaise. Pulse a few times until everything is combined well. Season with salt and pepper to taste and transfer to small bowl.
Light a charcoal grill under medium high heat. Rub small amount of olive oil onto salmon fillets. Season with salt and pepper. Spread desired amount of lemon mayo on salmon fillets. Grill salmon fillets, skin side down first, on direct heat for about 3-4 minutes per side.
To assemble sandwiches, place a good amount of leftover lemon mayo onto bottom slice of toast. Place lettuce leaf atop mayo and add salmon fillet. Top with tomato and 3 sliced of bacon. Close sandwich with remaining piece of toast and enjoy!
I found it really hard not to like this sandwich. Who knows, it could have turned out worse with the actual trout? We'll never know will we? But what I do know, is that salmon saved the day and made these a permanent sandwich in the sandwich rotation! Enjoy!
Friday, July 2, 2010
Cheesy Beefy Potato Soup

First of all... I just want to say, I am so glad to be off work today. It was an absolute madhouse. From crazy customers, to irate individuals, and just a damn busy day... it feels so nice to pop open a Stella and write this blog.
We've all seen those "munchie-themed" movies/tv shows like Half-Baked, or Harold & Kumar, or practically any Dave Chappelle skit, but I was reading an article from MercuryNews.com about a little bakery/shop that provides a "gourmet" look at munchies. Yeah, the menu looked pretty tasty, with things like cheddar jalapeno muffins, Ghiradelli triple-chocolate lavender brownies, pissaliere, and a roasted sun-dried tomato soup. So what's so different about this place? Well, it uses something called "cannabutter"... which is basically melted butter, water, and crushed marijuana mixed together, then allowed to harden. Yeah... a sophisticated pot head's dream right? Well... turns out, even though they've legalized medical marijuana out in California (where the shop is located), some laws haven't been made to allow this sort of thing to keep going on, so the shop is going to have to close down by next Wednesday.
Minus the whole marijuana theme, the actual menu sounds pretty tasty, even without using the illegal goods. Might have to try whipping up my next batch of brownies with a hint of lavender.
Anyway... this potato soup is probably one of the best I've ever had. It's perfectly cheesy, loaded with potatoes, and has that perfect hint of jalapeno and bacon that just set it off!
Ingredients:
8 oz. cheddar cheese, shredded
1/4 cup flour
5 Yukon Gold potatoes, diced
1 tablespoon butter
2 carrots, peeled and diced
1 onion, diced
salt and pepper to taste
1/2 teaspoon garlic powder
1 teaspoon onion powder
1 lb. ground beef
3 cups chicken broth
1 can beer (I just used some Miller Lite I had in the fridge, nothing fancy)
1 teaspoon parsley
1 & 1/2 cups milk
1/2 cup heavy cream
1/4 cup sour cream
1/4 cup jarred jalapenos, diced
1-2 tablespoons liquid from jalapenos
5 strips bacon, cooked until crispy and chopped
In a medium bowl, toss the shredded cheese with the flour and set aside.
Bring a large pot of water to a boil and add potatoes. Salt well and simmer until soft, about 8-10 minutes (Yukon Golds are pretty soft for a potato to begin with so it shouldn't take long). Drain pot to remove water and return potatoes.
In a large skillet, melt butter under medium high heat. Add the carrots, onion, salt and pepper, garlic powder, and onion powder. Cook until vegetables have started to soften, about 5 minutes or so. Add the ground beef and cook until browned. Strain any fat, if needed. Pour mixture in pot with potatoes.
Add in chicken broth, beer, and parsley and bring heat to about medium. Simmer for about 5 minutes. Add milk and heavy cream. Simmer for another 3-5 minutes, and be careful not to let soup come to a boil. Turn off the heat and stir in cheese until it is all melted. Stir in sour cream and jalapeno juice. Season with salt and pepper, if needed.
Ladle soup into deep bowls and top with chopped jalapenos and chopped bacon.
Like I said, this is one of THE best potato soups I've ever had. I know a lady named Rhonda that makes a hell of a potato soup also, so I can't say it tops hers, but it gives it some stiff competition. Enjoy!
Labels:
bacon,
beef,
cheese,
jalapenos,
louisville,
potato soup,
quick,
soups
Tuesday, September 1, 2009
Corn & Bacon Chowder W/ Seared Jumbo Scallops

Chowder or Chowdah. However you say it, it's delicious. Most of you know the version of clam chowder that New Englander's love, but few know about the corn chowder, which is my personal fave. The sweetness of the corn just tickles your senses and the savory bits of bacon throughout don't hurt either. Plus, I've never met a bacon I didn't like! The seared scallops were pretty to look at, and quite amazing. It's now September, so these hearty soups need to help keep us warm, because before you know it, the dreaded bitch of a winter will be here.
Ingredients: (adapted from Food & Wine May 2003 issue)
5 slices, thick cut Black Forest bacon
1 medium sized onion, finely diced
2 celery ribs, finely diced
1 15 oz. bag frozen corn (3 cups)
3 cups milk
1 lb red potatoes, diced
1/2 cup heavy cream
1/2 handful of chives, minced
salt and freshly ground black pepper
Frank's Red Hot Sauce to taste
6 jumbo sea scallops
Cook bacon in a large saucepan until crisp, about 10 minutes. With a slotted spoon, take out bacon and place on paper-towel lined plate and reserve. Save 2 tablespoons on the bacon fat for searing the scallops. Then add celery and onion to saucepan and wilt down for about 12 minutes.
While onion and celery are softening, puree 1 cup of the frozen corn with 1 cup of the milk. Add puree to saucepan along with remaining corn and milk. Also add in potatoes. Simmer until the potatoes are tender, about 25-30 minutes on low to medium heat. Then stir in chives, bacon, salt, pepper, and hot sauce. Keep warm on low temperature.
Heat bacon fat in separate pan on high heat.
Season scallops with salt and pepper and sear both sides for about 1 & 1/2 minutes per side.


Put soup in bowls and top with nicely browned scallops. Enjoy!

This was tasty and hit the spot!
Labels:
bacon,
chowder,
corn,
louisville,
scallops,
searing scallops,
soup,
winter food
Subscribe to:
Posts (Atom)