Hey guys! It's Peggy from My Fiance Likes It So It Must Be Good! By now, you've realized that this is the new blog! Easier web address, shorter, and to the point! I'm married now, so I figured I'd start fresh with everything! Glad you guys could stop by =)
So it has been a while since I'd posted my Blitz Puff Pastry post, and I had promised to let you know what I'd done with it... well, that was month ago! I'm glad you could bare with me though, because this is definitely a tasty treat!
Ingredients:
Blitz Puff Pastry, slightly thawed
1 cup Duxelles - I like this recipe
1 cup Shredded beef - I just used the leftovers from this recipe
Preheat oven to 375F.
Take your slightly thawed puff pastry (you'll want it thawed enough to be pliable) and on a floured surface, roll out to between 1/8 and 1/4 inch thickness.
With a 2 inch round biscuit or cookie cutter, cut out circles in the dough.
In the center of the circles, place about 1 teaspoon of duxelle mixture.
The place about 1 to 1 & 1/2 teaspoons of the shredded beef filling on top of the duxelle mixture.
Get a cup of luke warm water and dab the edges of the circle. Fold the top over the filling and seal edges. You can make it decorative by using the pointed end of a paring knife to press down on the dough.
Be sure to vent the top of the empanadas so they don't explode while baking. This is easily done by taking some kitchen scissors and, at an angle, cutting a small portion of the dough.
Repeat with remaining circles of dough until you have a little empanada army.
Bake for about 10-15 minutes, or until empanadas are golden, brown, and delicious!
Serve with your choice of sauce - I made a brussels sprout salsa and some brown gravy to go with ours!
The possibilities on empanadas are endless, so feel free to experiment with fillings and sauces!
Hope you guys like the new blog, and can't wait to start posting more often (crossing my fingers!)
Sunday, May 13, 2012
A new chapter...
Hey guys! I know it's been forever since I've done a post, but just wanted to let you know I've developed a new blog - Feeding Andy!
It's still pretty simple in format (when I have time, I'll spruce it up), but I hope you join me there from now on!
A new chapter...
Hey guys! I know it's been forever since I've done a post, but just wanted to let you know I've developed a new blog - Feeding Andy!
It's still pretty simple in format (when I have time, I'll spruce it up), but I hope you join me there from now on!
Monday, May 7, 2012
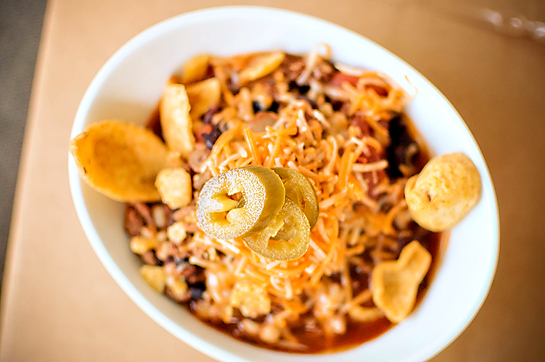
Secret Recipe Club: Barbecue Chili w/ Corn
Well hello there! It's been about a month since my last post! Trust me, April was a whirl wind of a month. First and foremost - I GOT MARRIED! We went to Vegas for our honeymoon and had a blast! And this past weekend was Derby weekend (which is basically the Black Friday for restaurants around here - it's been CRAZY busy and I'm utterly exhausted!).
Anyway, I'll definitely post pictures as soon as I can.
But the reason we're here right now is to talk about a club. The Secret Recipe Club. One of my favorite blogging groups. It's like a secret Santa for food bloggers. You end up with an awesome blog to pick a recipe and blog about, and in return, someone ends up with your blog, as well! Exciting, huh?
Well this month I got the pleasure of getting Connor's Cooking. Raina has a plethora of great recipes to choose from. Everything from Shrimp Tortellini Pasta Toss to Guacamole. It was a hard decision, but I settled on Raina's Barbecue Chili w/ Corn. It was a quick and easy meal, that made enough to feed us for a few days!
The only changes I made were to use black beans instead of barbecue baked beans and chipotle chili powder instead of regular, but only because I had those on hand already. The recipe was quite tasty and I'll definitely be making it again and again!
Ingredients:
Adapted from Connor's Cooking's recipe
1 lb. ground beef
1 large onion, diced
14.5 oz. can seasoned black beans
14.5 oz. diced tomatoes, undrained
1 cup tomato sauce
1 & 1/2 cups frozen corn
1 tablespoon chipotle chili powder
1 teaspoon ground cumin
1/2 cup shredded habanero cheddar cheese
2 cups corn chips
pickled jalapenos (optional)
salt and pepper, to taste
In a large pot under medium high heat, add ground beef and onions and cook until beef is no longer pink. Drain.
Stir in black beans, tomatoes, tomato sauce, corn, chili powder, and cumin. Bring to a boil and then reduce to a simmer. Simmer for about 10-15 minutes, stirring occasionally, until corn is tender. Season with salt and pepper, to taste.
Ladle chili into bowls and top with your favorite chili toppings. Enjoy!
Hope you guys check out Connor's Cooking and if you're interested in joining the Secret Recipe Club, click here to find out more!
Monday, April 9, 2012
Secret Recipe Club: French Dip Sandwiches
My most exciting time of the month - Secret Recipe Club reveal day!
I had the pleasure to be assigned the blog Mom's Fridge. I've been to Barb's blog before and everything on there is a hodge-podge of comfort food and foods that make you think of home (if you're not already there, of course). You can find things like Ranch-Style Macaroni Salad to Caramel Filled Snickerdoodles. She's got it all!
One thing that stuck out in my head were these French Dip Sandwiches, though. I've just been so busy at work and school that I hardly ever have time to cook anything. So what better way to feel like I slaved over a meal than to throw it all in the crockpot! It's my favorite time-saving kitchen device. So without further delay, let's get to it!
Ingredients:
Adapted from Mom's Fridge
3 lb. bottom-round roast
2 cups beef stock
1 small onion, diced
salt and pepper, to taste
1 teaspoon garlic powder
1 tablespoon olive oil
2 baguettes, toasted
Heat a large skillet under medium high heat and add olive oil. Season meat on both sides with salt and pepper. Sear the meat in the skillet on all sides until you get a nice golden brown.
Place the seared meat into the crockpot and add beef stock, onion, and garlic powder.
Place on HIGH for 1 hour and then reduce heat to LOW for at least 6 hours.
Shred the meat and place on toasted baguettes. Serve with strained broth from crockpot. Dip to your heart's content!
This was a wonderful meal! I just loved dipping the sandwiches into the flavorful broth. This was definitely an easy winner for us!
Want to join the SRC? Check out the site now! And don't forget to check out Mom's Fridge too!
Saturday, April 7, 2012
Blitz Puff Pastry
Hey guys! Those of you who follow me on Facebook probably already know that I'm in a Baking lab this quarter so there's gonna be baking-related posts for a bit! Are you excited?! Alright!
Now this also means that we're going to be using scaled measurements here - I gotta do it in school, so might as well make it a habit of doing in real life! So bust out your digital scales!
Hope you guys are doing well, we're just finalizing all the little details for the wedding (22 days!!) and staying busy - as always.
So puff pastry. Tons of layers, tons of butter. But who has time to fold and turn, fold and turn, fold and turn?! That's where blitz puff pastry comes in. It doesn't quite rise as much as regular puff pastry, but it rises enough for presentation, and it's a whole lot quicker! Let's get to it!
Ingredients:
8 oz. bread flour
8 oz. pastry flour
1 lb. unsalted butter, softened
1/4 oz. salt
8 oz. cold water
My digital's batteries went out when I started the recipe so I had to bust out my spring scale. Definitely not nearly as accurate as a digital or a balance scale - but you have to be resourceful with what you have!
So now we sift our flours and salt together. You could definitely use a mesh strainer or an actual drum sifter, but our chef said in a pinch, a whisk works just fine too.
Just for fun, let's discuss the 3 purposes of sifting (because let's be honest, when a recipe tells me to sift, I rarely do, based on the shear fact that I'm lazy and don't want to go through all the trouble. Guess this Baking class is going to change my evil ways!)
#1 - to remove lumps - makes sense
#2 - to incorporate air - this is the big one, ever notice that after you sift dry ingredients they seem to amount to more mass? It's the air!
#3 - to create a homogenous mass - another big point. You want your individual ingredients to lose their sole identities to become one happy family.
And now we're gonna cut in our butter. You want to "crush" the fat into the flour, not "squeeze" it in there. Picture yourself making the "I want money" gesture, not the "I want to choke the chicken". You know what I mean?
Once you have the majority of the big chunks of butter incorporated into the flour, make a well in the center and pour in your cold water.
Use a bowl scraper or wooden spoon to incorporate the dough into the center until it forms a unified mass. Gentle now... we don't want to over work the dough. On a lightly floured surface, form the dough into a rectangle loaf.
Roll dough into a rectangle that is about 1/4 to 1/8 inch thick.
Fold the left and right sides toward the center, leaving a finger-width gap in between.
Then fold the sides together.
Then roll out into a rectangle about 1/4 to 1/8 thick again, and repeat entire process 2 more times.
Wrap up your finished pastry and place in the freezer for at least 8 hours or overnight.
And bam, you'll have puff pastry to use at your own discretion! Next couple of posts, I'll show you what I did with mine!
Hope you all have a great Easter holiday, if you're celebrating. Otherwise, just have a good rest of the weekend =)
Now this also means that we're going to be using scaled measurements here - I gotta do it in school, so might as well make it a habit of doing in real life! So bust out your digital scales!
Hope you guys are doing well, we're just finalizing all the little details for the wedding (22 days!!) and staying busy - as always.
So puff pastry. Tons of layers, tons of butter. But who has time to fold and turn, fold and turn, fold and turn?! That's where blitz puff pastry comes in. It doesn't quite rise as much as regular puff pastry, but it rises enough for presentation, and it's a whole lot quicker! Let's get to it!
Ingredients:
8 oz. bread flour
8 oz. pastry flour
1 lb. unsalted butter, softened
1/4 oz. salt
8 oz. cold water
My digital's batteries went out when I started the recipe so I had to bust out my spring scale. Definitely not nearly as accurate as a digital or a balance scale - but you have to be resourceful with what you have!
So now we sift our flours and salt together. You could definitely use a mesh strainer or an actual drum sifter, but our chef said in a pinch, a whisk works just fine too.
Just for fun, let's discuss the 3 purposes of sifting (because let's be honest, when a recipe tells me to sift, I rarely do, based on the shear fact that I'm lazy and don't want to go through all the trouble. Guess this Baking class is going to change my evil ways!)
#1 - to remove lumps - makes sense
#2 - to incorporate air - this is the big one, ever notice that after you sift dry ingredients they seem to amount to more mass? It's the air!
#3 - to create a homogenous mass - another big point. You want your individual ingredients to lose their sole identities to become one happy family.
And now we're gonna cut in our butter. You want to "crush" the fat into the flour, not "squeeze" it in there. Picture yourself making the "I want money" gesture, not the "I want to choke the chicken". You know what I mean?
![]() |
| The whisk doesn't belong in there (can you tell I'm rusty? Or rushed.) |
Once you have the majority of the big chunks of butter incorporated into the flour, make a well in the center and pour in your cold water.
Use a bowl scraper or wooden spoon to incorporate the dough into the center until it forms a unified mass. Gentle now... we don't want to over work the dough. On a lightly floured surface, form the dough into a rectangle loaf.
Roll dough into a rectangle that is about 1/4 to 1/8 inch thick.
Fold the left and right sides toward the center, leaving a finger-width gap in between.
Then fold the sides together.
Then roll out into a rectangle about 1/4 to 1/8 thick again, and repeat entire process 2 more times.
Wrap up your finished pastry and place in the freezer for at least 8 hours or overnight.
And bam, you'll have puff pastry to use at your own discretion! Next couple of posts, I'll show you what I did with mine!
Hope you all have a great Easter holiday, if you're celebrating. Otherwise, just have a good rest of the weekend =)
Friday, March 23, 2012
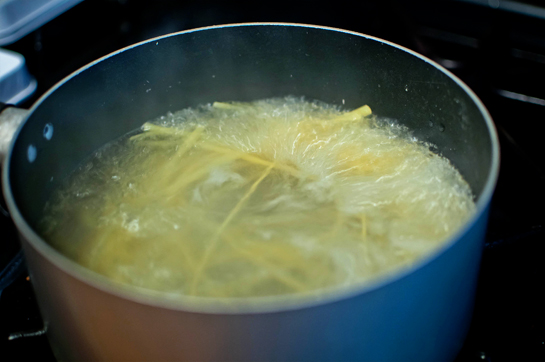
How-To: Boil Water
Hello again! Remember me? It just seems like my breaks between posts keep getting longer and longer, don't they? But I promise I'll always return!
Anyway, we're down to 36 days until the wedding! Can you freakin' believe it?! Just yesterday, I could remember it being ages away (like 2 years away!). And it's coming up quickly. We pretty much have everything taken care of, just need to make the final payments on some things and we'll be good to go.
I'm in between quarters at school (next quarter starts Monday - BAKING! - so expect a bunch of baked goods in the near future) and catching up on some spring cleaning, so I haven't done much cooking - especially since life is crazy busy! I know the title of this post may deter some of you, I mean, hell... shouldn't we all know how to boil water? Believe it or not, I've actually seen a lot of people that do this incorrectly! Take my lovely other half, for instance. I find him putting the pasta in the pot, covering it with water, and THEN putting it on the stove. I can even admit that I'm guilty of this every now and then. A lot of people think that it's faster to do it that way, but honestly - it just wastes more time!
So this isn't necessarily a "how-to" per se, but more of a post of tips. So let's get to it!
1. Starting with cold water, put enough water into a pot to cover whatever you'll end up boiling (i.e. pasta). Bring water to a boil over high heat. Add salt to season.
2. Add your desired food to the water (in my case, pasta). The temperature will drop when you add the food, so you'll want to keep the heat on high to bring it back to a boil. Then reduce the temperature, as needed, just to maintain a boil.
3. Cook the food until it reaches your desired texture/doneness.
You want to serve boiled food right away, unless you plan on shocking it after (placing in ice water).
I know this may have seemed like a pointless post to some of you, but I've come to learn that the little things are what make your meals amazing. Whether it be properly heating up a saute pan, bringing water to a full boil, or even something as simple as adding a pinch more salt to something. It's the little things that don't get the credit, but it's also the little things that bring something from "meh" to "wow, what's your secret?!"
Hope everyone has a great weekend! I've got to work at the restaurant tonight, but I've got the whole weekend off. Andy and I are planning on being lazy - but that never works out! See you guys in a few days =)
Subscribe to:
Posts (Atom)