Ok, so this past weekend I discovered that Louisville was home to a Clearwater Seafood Distribution Center. So what do I do? I order two fresh live lobsters to be delivered to my home.
Who knew that this would be the most gratifying and traumatic experience I've had in a long time.
The little critter moved! I've never had my food move! Of course they're gonna move, Peggy, they're alive. What would make me think that it would be easy.
So as I opened the cooler box that they came in, I could feel my body tremble with fear. I'm bigger than these guys and they scared the heebie jeebies out of me! What a wuss I was. I frantically called Andy about 4 or 5 times while trying to kill these babies. He just laughed and said he would do it when he got home from work. But no, I needed to step up to the challenge. I couldn't just give up and let somebody else do it, especially Andy because I would never be able to live it down.
So first I needed a bigger pot. The pot that I had definitely wasn't big enough. So I left the house to go to the store to buy the needed equipment. This made things a tad bit easier. So while waiting for the water to boil in my giant pot, I tried to regain composure. By then, Andy came home and asked me if I wanted him to do it. I had to at least do one of the two lobsters. So I grabbed one of them with a paper towel and as it was flailing it's claws I closed my eyes, dropped the sucker in the pot, and quickly put the lid on. And just silence. No screaming lobsters, no fight, just silence. What a relief.
By then, I was relaxed and felt a new appreciation for chefs that do this on a daily basis. And I let Andy throw the other sucker in there because I had done enough lobster killing for the day. Anyway, had a pharmacist friend, Mike, over for dinner yesterday. He has been my food guinea pig at work for quite some time, so thought I'd treat him to a little surf n turf meal with my new cooked friends.
Chili Lobster Ingredients:
3 head of baby bok choy
2 1 & 1/2 lb live lobsters (or if you don't want to go through the trauma you can just buy cooked lobster meat)
1/8 cup vegetable oil
3 garlic cloves, chopped
1 cup chicken stock
1/4 cup ketchup
2 tablespoons sambal oelek (chili sauce)
1 large egg, lightly beaten
1 red bell pepper, sliced into 1 inch strips
In large pot of boiling water, cook baby bok choy until bright green. It just really needs a quick dip in the pool. Then take out with a slotted spoon, pat dry, and set on rimmed baking sheet and cover with aluminum foil.
Allow water to come back to a boil and add lobsters, one at a time. Cook each for about 7 minutes, when lobster looks bright red all over. Let lobsters cool on baking sheet. Crack claws from body and chop tail off and remove meat from both. You can save the head and upper body for a flavorful broth, but you won't be using them for their meat. Chop meat up into small bite size pieces, but don't over do it. Put on top of bok choy on baking sheet and cover lobster meat with damp paper towel. Then cover tightly with aluminum foil. Set aside.
Preheat oven to 375 degrees. In skillet, heat up the oil. Add the garlic and cook until light golden brown. Then add chicken stock, ketchup, and chili sauce and simmer over high heat for a couple of minutes. Add the egg and keep stirring until sauce is thickened and egg is incorporated throughout. Remove from heat, salt to taste and place in serving bowl.
Bake covered lobster and bok choy for about 7 minutes, until heated through. Serve lobster on top of bok choy, top with sauce, and garnish with red pepper slices.
Sirloin Steak (Turf) Ingredients
1 large sirloin steak (about 1 - 1/2 lb), cut into 2 medium sized steaks
1/2 cup red wine (like a cabernet savignon)
1/2 cup beef broth
1 garlic clove, minced
1 tablespoon flour
In large stainless steel pan, cook steak to desired consistency. I like mine medium rare, so it was about 5 minutes or so per side. Let steak rest on cutting board.
Meanwhile, add garlic and flour to pan with sucs (those delicious brown bits from steak). Cook for about 1 minute, or until fragrant. Then deglaze pan with wine and broth, making sure to scrape the sucs from the pan so they're incorporated in the liquid. Reduce liquid until desired consistency.
Cut steak into strips and top with sauce. Pair with lobster and there you have a delicious surf n turf!!
Monday, August 31, 2009
Friday, August 28, 2009
Links!
So, like many of you, I continuously look for inspiration on the internet, TV, newspaper... ANYTHING! I've got food on the brain 24/7 it seems. So from now on, every other Friday (mainly because it's Andy's grocery week and I don't get to cook any meals) I'm going to feature some links that have kept me busy in my non-cooking week. Enjoy!
Not Without Salt - Recipe for homemade marshmallows! Great with hot cocoa ( I know hot stuff really isn't the thing to think about in the heat of summer, but on a rainy day... you never know)
Tastestopping - "Not sharp/unflattering composition" Those words make me CRINGE! This is a sight that posts pictures that the other sites won't. Equal opportunity posting.
The Daily Kitten - Some great everyday tips that everyone should now. Some are a little wacky, but some are really informative!
Top Secret Recipes - This guy demonstrates how to get KFC chicken! I'm a sucker for fried chicken so this was good. Also, many other chain restaurants' (even though I hate chain restaurants) meals exposed.
Peach Cakes - These little cakes look just like a real peach! Great practical joke or delicious treat!
Well that's it for this go around. Stay tuned for next week, I've got a great chili lobster recipe coming up! Ordered fresh live lobster online the other day and the little guys should arrive tomorrow!
Monday, August 24, 2009
Vaca Fritas - Cuban "Fried Cow"
This past weekend, to give us a last hoorah before the fall semester of school starts, Andy and I went out to West Virginia with a group of friends and went white water rafting. I was the only one who had ever been before, and just like before, it was an AMAZING time. With car break downs, over 150 beers, and pretzel pong, we made it through the weekend. The feeling of being back home from the wilderness was a great joy. So to celebrate coming home, I made Vaca Fritas, a traditional Cuban dish of crispy beef.
Ingredients:
1 & 1/2 lb flank steak, cut into 4 pieces
1 green bell pepper, roughly chopped
2 large onion, 1 cut in half, and the other thinly sliced
1 bay leaf
2 garlic cloves, smashed
salt
juice from 1 lime
3 tablespoons olive oil
freshly ground black pepper
Adapted from Food & Wine May 2009 issue
In a large pot or saucepan, combine steak, green pepper, halved onion, and bay leaf. Cover with water and simmer under medium to high heat for about 20 minutes. Take steak out and let rest on cutting board. Strain the broth and you can either pitch it or save it for another dish. I always take the opportunity to save fresh stock as opposed to buying bouillon cubes or stock/broth. It keeps for a fairly long time if you freeze it or keep it in the fridge.
When steak is well rested, shred it up and place in a large bowl. I used a fork and just starting going at it. At some point I think I was using my bare hands and pulling it apart, but it's some work.
Take smashed garlic and mix with salt. Mix garlic in with beef and add lime juice, olive oil, and sliced onion. Mix until well combined. Let marinate for about 30 minutes.
Next heat pan to very hot. In batches, line pan with thin layer of beef mixture and season with salt and pepper. Cook over high heat until crispy in spots, about 6 minutes or so.
I served this with some spicy black beans and basmati rice. It was a humble and simple meal, but packed full of flavor. Enjoy!
Friday, August 21, 2009
Shaking Beef - Vietnamese Bo Luc Lac
I was intending to cook this for dinner a couple nights ago, but we ended up eating out instead. So to make up for it, I made it for lunch yesterday. I think it actually was a better lunch meal anyway. It wasn't too fussy, it was very light, and it was delicious!
Ingredients:
Juice from 1 lime
1 tablespoon fish sauce
1 tablespoon sugar
2 mexican red chilies, chopped
1 tablespoon oyster sauce
2 teaspoons soy sauce
1 large sirloin steak, cut into small cubes
2 to 3 tablespoons corn oil
2 cloves garlic, sliced
1 can chunked pineapple, drained
1/2 cup fresh basil, chopped
1/2 red onion, thinly sliced
3 cups watercress, washed and chopped
1 tomato, cut into wedges
Recipe adapted from SeaSaltWithFood's Blog
First combine lime juice, peppers, and fish sauce in large bowl.
In a separate medium bowl, combine oyster sauce, soy sauce, and steak. Toss until steak is nice and coated.
Heat oil in wok under medium to high heat and throw in garlic. Saute until just sizzling. Then add steak and cook until charred or to your likeness. Then remove from heat and add steak to lime juice mixture. Toss to coat evenly.
Add pineapple, basil, and onions. Continue to toss until well incorporated.
For plating, lay down nice arrangement of watercress and tomato wedges. Then place beef mixture on top. Enjoy!
Thursday, August 20, 2009
Spaghetti Aglio E Olio
If you're reading the title, most of you are like, aglio e olio what?!?! Don't be deterred by the fancy name, it's pretty much a simple rustic Italian dish. Quite easy, but timing is crucial! So make sure you have everything ready!
Recipe is from Rouxbe.com, an online cooking school that offers a free tutorial video everyday. So I highly recommend checking it out!
Ingredients:
2 cloves garlic
1/4 teaspoon red pepper flakes
4 tablespoons olive oil, divided
salt
1 package spaghetti pasta
1/2 cup cooking water from pasta
4 fresh basil leaves
parmesan cheese, to taste
Preheat your oven to your lowest setting. You won't actually be cooking any food in there, but instead warming up your plates. Pasta gets cold very quickly, so if you ever wondered why you always get a "hot plate" at most restaurants, it's to prevent food from getting cold before you can eat it! Cool huh?
Anyway, heat up a pot of COLD water and bring to a boil for the pasta. While you're waiting for that, slice the garlic up thinly and get your red pepper flakes ready.
In a large pan, add half of the olive oil, the garlic, and the pepper flakes. Do not turn the heat on just yet. Just let the ingredients mingle with eachother.
When pasta water is at a boil, add salt and stir. Add the spaghetti to the water and stir until you make sure the pasta will not stick.
While the pasta is cooking, turn the garlic on to medium heat. Spread it out enough so that it evenly cooks, but not too far apart, as it will burn easily. As soon as you hear the garlic sizzling, remove it from the heat and let sit while the pasta continues to cook.
Place your plates in the oven to get warm. I put mine right on the rack and they were fine. Just be careful when taking them out because they will be quite hot.
When your pasta reaches al dente, drain the pasta and remember to reserve 1/2 cup of the cooking water! Once the pasta is drained, add it into the pan with the garlic.
Turn the heat back on to medium and add in cooking water. Toss to coat pasta and stir until pasta water is entirely evaporated. Add salt to taste and tear some fresh basil leaves on top and toss to coat.
Turn off the heat and then add remaining olive oil and add as much parmesan cheese as you would like. I added about 1/4 to 1/2 cup.
Serve pasta on warm plates and top with additional parmesan or basil leaves! Enjoy!
Wednesday, August 19, 2009
Pancetta Wrapped Meatloaf
There is nothing more satisfying than bacon. I absolutely LOVE bacon. Almost more than Andy. That says A LOT. So when I saw that Food in My Beard had this awesome recipe for this meatloaf, I knew it was going to be amazing. Besides, how can you go wrong with crispy bacon-y goodness?!?!
Ingredients
1 lb ground beef
1 lb ground turkey
2 cloves garlic, chopped
1 green pepper, chopped
couple bunches of parsley, chopped
1 onion, chopped
1 yellow squash, chopped
1/2 cup of breadcrumbs
1/2 cup of Parmesan cheese
freshly ground pepper
pretty big pinch of red pepper flakes
Meatloaf isn't rocket science, so this is pretty straight forward. Throw all the ingredients in a bowl and mix up until everything is evenly throughout the loaf. Form the meat madness into a big loaf.
Then on some parchment paper, line up pancetta rounds. I did a 5 x 3 grid. Then put loaf on top of pancetta, kind of in the middle and wrap loaf with parchment paper. Unravel parchment paper, but be careful not to unravel the pancetta. It should stick pretty well to the loaf. I didn't have enough pancetta to wrap the whole loaf, mainly just the top, but that was fine with me. Get more pancetta if you think you need it though.
Preheat oven to 375 degrees and bake the loaf for about 45 minutes to an hour. I found that 45 minutes wasn't enough for my thick hunk of meat, so after 45 minutes, I drained the loaf of the juices, and put it back in the oven for about 15 more minutes.
It was DELICIOUS!
I also made a quick tomato sauce for on top with 1 can San Marzano tomatoes, garlic, olive oil, and parmesan cheese that was also on FIMB page.
Enjoy!
Labels:
bacon,
baking,
meat,
meatloaf,
tomato sauce,
vegetables
Tuesday, August 18, 2009
Kung Pao Chicken Drumsticks
So I've noticed the past couple recipes I've done have been asian-inspired dishes. I can't help it if I'm partial to my people, but I promise, there will be more diversity to come. And I'm also happy to report that I know am the proud owner of a Nikon D40 SLR camera. My shots should be better and more appealing, once I start playing around with the thing and getting used to it. I'm officially obsessed is was Andy tells me.
Anywho, I LOVE kung pao and decided that in honor of our 2009 fantasy football draft, that I would cook up a batch for my friends and show them that cooking good food is not "nerdy"... but a delicious hobby.
Adapted from a Food & Wine Magazine May 2009 Recipe
Ingredients:
1/4 cup vegetable oil, plus more for frying
1 garlic clove, minced
1 tablespoon grated ginger
1/4 cup dried chile de arbol (I used about 25 of those suckers)
1/2 cup sugar
1/2 cup soy sauce
1/4 cup dry sherry
1/2 teaspoon red wine vinegar
2 tablespoons cornstarch dissolved in 3 tablespoons water
1/2 teaspoon sesame oil
12 chicken drumsticks
salt and freshly ground black pepper
all purpose flour for dusting chicken
chopped roasted peanuts for garnish
In medium saucepan, heat the 1/4 cup vegetable oil. Add garlic and ginger and cook until fragrant. Careful not to burn the aromatics! Add the dried chiles and cook until they turn dark red, shouldn't take too long. Lower the heat and add sugar, soy sauce, sherry, vinegar, and simmer it until the sugar dissolves completely. Remove from heat and cover sauce and let sit for about 1 hour. This sitting time allows the flavors from the chilies to develop with the rest of the liquids.
Strain the sauce and return liquid to saucepan. I saved the dried chilies for my garnish at the end, but you can throw them away if you'd like. Bring sauce to a boil and whisk in cornstarch mixture. I love the magic of cornstarch! It's a quick fix thickener! Remove sauce from heat and stir in sesame oil. I didn't think my sauce was hot enough, so I added a few pinches of some red pepper flakes, but if you like it sweet, then you don't have to!
Preheat your oven to 400 degrees.
Fill a large pot with about 3 inches of oil and bring to about 325 degrees. Season chicken with salt and pepper and dust with flour. Put a rack on a baking sheet near the stove. In batches, fry drumsticks until brown and crisp. Drain chicken on rack and keep warm in oven while other batches are frying.
Once all chicken is done, let rest and allow to cool slightly. Take sauce and "paint" drumsticks. I found it best to use a spoon and just dab the chicken in spots and spread it around, but whatever way is ideal for you, be my guest. Top with roasted peanuts (just take regular peanuts and heat up in a pan for about 1 to 2 minutes until warm) and you're all set!!
This was definitely a crowd pleaser! I almost wish I would have made more. Poor Andy was trying to be polite and let everyone get some first, and ended up waiting too long that there were none left!! Great thing to make for the upcoming football season though! Enjoy!
Monday, August 17, 2009
Thai Red Curry W/ Zucchini & Tomatoes
Curry is one of my favorite things to eat. I've never tried cooking it, so when I saw this recipe, I had to give it a go. I love the heat that enters my mouth when tasting a delicious curry. It never fails to clear my sinuses, and always pleases.
Ingredients:
3 tablespoons vegetable oil
1 lb chicken breasts cut into strips
salt and pepper to taste
1 onion, sliced thin
2 zucchini cut into strips
1 cup cherry tomatoes, or roma tomatoes quartered
1 tablespoon thai red curry paste (or more if you want it more spicy)
1/2 cup unsweetened coconut milk
2 tablespoons water
zest of 1 lime
1 tablespoon lime juice
1/2 cup chopped cilantro
I couldn't believe how easy and versatile this recipe was. Any of the ingredients could easily be substituted out. You can vary your proteins, the vegetables, and even the curry paste comes in red, yellow, and green varieties. Definitely something you can play with to find your perfect curry match!
In a large wok, heat 2 tablespoons of the oil. Add the chicken. Season with desired amount of salt and pepper and cook until white throughout. Then take chicken out and set aside on a plate.
Add remaining oil to wok and stir in onion until just soft. Then add zucchini and tomatoes and stir fry for about 2 minutes. Stir in curry paste, coconut milk, water, lime zest, lime juice, and bring to a simmer.
Add chicken back in and stir in cilantro. I must say, cilantro is definitely a powerful flavor, but this is one dish where it did not overpower anything. It was more of a subtle taste, and I'm glad it was, because Andy doesn't really like cilantro, and I like how I was able to sneak it in there.
And you're done! Serve over rice and enjoy!
Sunday, August 16, 2009
Ginger Soy Grilled Chicken
This past weekend I made Andy come with me to watch the Julie & Julia film. Let's just say he felt a little emasculated after it was all said and done. Me, on the other hand, can totally relate to the movie and I thought it was rather cute. Kind of made me think of one day publishing an Asian-Fusion cookbook for Americans. Really, I think there's a market for it. How many people pack into Asian/Chinese buffets every single day? Tons! And that's not even the best part of Asian-inspired cuisine! There's such a range and such a flavor in Asian dishes that I don't think it gets enough credit.
That's exactly why I'm posting this dish. This is by far, the best way to cook chicken, in my opinion. The ginger, the soy, they mix to make just a delicate and delicious balance of flavors.
Ingredients:
2 lbs. chicken thighs (about 10)
1/2 cup soy sauce
1/2 cup sugar
1/2 cup water
1/4 cup sesame oil
1/4 cup mirin or 1/4 cup sake (I put in both)
2 cloves chopped garlic
4 tablespoons grated/minced garlic
1 tablespoon toasted sesame seeds (you can buy them that way or you can quickly saute them in a pan to get them hot and voila! they're toasted!)
freshly ground black pepper
This recipe is absolutely fool-proof! If you like a different part of the chicken, be my guest, but for those of you that are always scared of drying out chicken or cooking it for too long, chicken thighs are ALWAYS your best bet! It's practically impossible to dry them out so they're perfect!
Just mix all ingredients in a big enough tub to cover the chicken and let sit in refrigerator for about 6 to 8 hours, or leave in overnight so the chicken and the marinade can become one! Osmosis is your friend!
When chicken is ready, heat a grill to medium heat and cook until cooked through. Like I said, it's practically impossible to dry out chicken thighs, so really all you're worried about now is burning the chicken, so watch the grill with a keen eye!
Enjoy!
Labels:
asian cuisine,
bbq,
chicken,
easy,
ginger,
grilling,
louisville,
soy
Tuesday, August 11, 2009
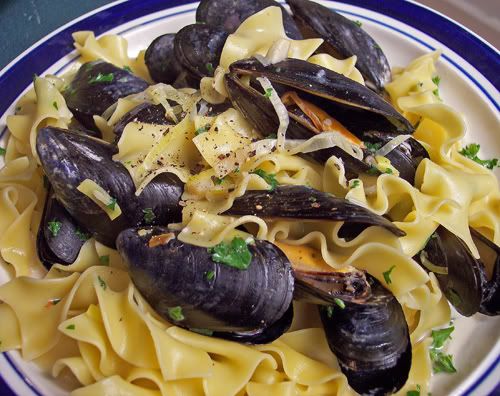
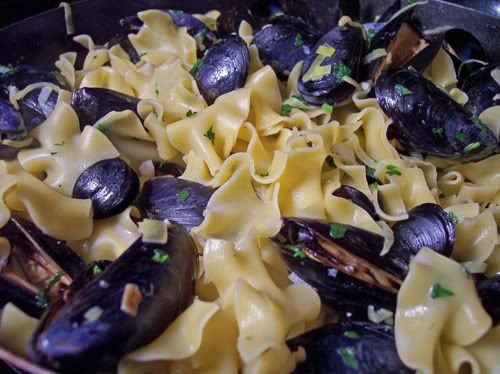
Mussel & Leek Pasta
Mussels are probably my favorite reasonably-priced shellfish. My all time favorite is, of course, lobster. But considering lobster is not always readily available here in Louisville, mussels are always the way to go. My mother makes a mean batch of mussels. I have absolutely no idea what she puts in the broth to steam them, but it's a perfect blend of everything enjoyable that someone would want to put in their mouth. That's exactly why I love this dish, it comes VERY close to that flavor.
Ingredients:
2 lbs mussels
1 leek, white part cut off, and the green part cut into rings
2 cloves garlic, chopped
3/4 cup fresh parsley, chopped
1 tablespoon olive oil
1/2 cup chicken stock
1/4 cup heavy cream
1 cup white wine
1/4 cup fresh Parmesan cheese
1 bag of pasta of your choice (I used No Yolk Egg Noodles)
Clean the mussels and remove their "beards". After spot cleaning, let mussels soak in bowl of cold water for about 15 minutes. Then strain mussels and set aside. This ensures all the sand and grit is removed from the mussels as much as possible.
Set up a pot of water and bring to a boil. Add pasta and cook until about al dente, probably around 5 minutes depending on the type of pasta.
Heat olive oil in wok under medium to high heat and add garlic. Cook until just about light brown. Stir in leek rings and cook until just wilted. Add the mussels, stock, and wine. Cover and let steam until mussels begin to pop open.
With tongs, as mussels start to open, remove them and set aside.
This is where things got interesting. The broth the mussels were steaming in smelled so great that I almost didn't want to eat it. But, instead, I heard the broth screaming at me instead. It begged to be creamed. (Add the cream to the pan now) Or maybe it was the wine I was drinking along with making all of this that made me hallucinate all of this. But either way, it was a match made in heaven. The sauce went from a pale mussel stock, to a creamy mussel cream. Yeah, didn't know how else to describe it. Oh but wait, that wasn't all. I had some fresh Parmesan cheese in the fridge and grated it into the sauce as well. Match made in heaven, or wok at least.
After the sauce thickens just a tad, add the strained pasta and mussels back into the pan. Stir until well combined. Top with fresh chopped parsley and serve! Enjoy!
Friday, August 7, 2009
Raspberry-Walnut Grilled Chicken Salad
We never have salad for dinner. But, to go along with our healthy eating, I figured why not. I've got to get that bikini body ready somehow and I've only got 1 more week until our vacation! I'm definitely in need of one considering I've taken two summer classes already and yesterday was my last day. It was a relief lifted off of my back to know that I got an A in both!
Anyway, got off on a little tangent there, but I was browsing some recipes and found this lovely cherry chicken salad recipe over at More Please.
I WAS going to use dried cranberries instead of cherries, but I forgot to save some cranberries from our cranberry-bacon fried rice the other day, that I just opted to do without the fruit because I was too lazy to go to the grocery. And a couple other tweaks also...
Ingredients:
2 Chicken Breasts
1 tablespoon strawberry jam
1/4 cup plus 1 tablespoon raspberry walnut vinaigrette
1/2 cup olive oil
1/4 cup lime juice
1/4 cup lemon juice
1 tablespoon shallot, minced
salt and pepper to taste
bag of spring mix
1/4 cup maple sage walnuts
1 cup walnuts
3 tablespoons syrup
1 teaspoon dried sage or 1 fresh sage leaf chopped finely
4 tablespoon goat cheese
Combine jam, 1 tablespoon raspberry walnut (or any fruity vinaigrette really), olive oil, lime juice, lemon juice, shallow, salt and pepper in medium sized bowl. Add chicken and mixture into plastic bag and let marinate for about 2-3 hours.
While chicken is marinating, you can make the maple sage walnuts. These were probably my favorite part of the salad. Such a good use of walnuts.
In a small skillet under medium heat, add walnuts, syrup, sage, and a pinch of salt and cook for about 3-4 minutes. Make sure syrup covers all of the walnuts and let cool. Easy huh??
When chicken is finished marinating, preheat oven to 400 degrees.
Heat medium sized oven proof skillet under medium to high heat and sear chicken until golden brown on both sides, about 3 minutes per side. (as an alternative to an oven proof skillet, you could always lay a baking sheet in the oven while it's preheating, and when done searing chicken on stove, add chicken to hot sheet pan). Then put skillet in oven and cook chicken for about 10 more minutes. The searing of the chicken on the stove first allows the chicken to be "sealed" with flavor, and in my experience, I've found this to make the chicken juicier while it's in the oven, not dried out.
When chicken is cooked through, allow it to rest for about 5 minutes.
Prepare even amounts of spring mix on two plates. Slice chicken and add on top of salad. Sprinkle walnuts, goat cheese, and if you want to some dried fruit (cranberries, strawberries, or cherries). Then drizzle vinaigrette over salad and serve!
This is definitely a delicious and light meal that's great on a hot summer day!
Labels:
cooking,
easy,
grilled chicken,
louisville,
raspberry,
salad,
walnut
Thursday, August 6, 2009
Steamed Lime-Ginger Basil Tilapia W/ Cranberry Bacon Fried Rice
I think for the first time ever, I actually went to Whole Foods and couldn't find what I really wanted. I wanted a whole trout. No trout whatsoever. I wanted a whole fish, but they only had Red Snapper or Mackerel and neither tickled my fancy (especially because we we're on a really tight budget) while I was at the counter. So hmm... I go in with a game plan and have to improvise I guess. I know a lot of people give Tilapia a lot of slack, because it's not worthy or whatnot. But I believe in giving every fish a chance, so I chose Tilapia.
Ingredients for Trout:
2 Tilapia fillets (or any white fish)
1 Lime
1 tablespoon minced or grated ginger
3 fresh basil leaves
salt and pepper to taste
olive oil
Preheat oven to 375 degrees.
Lay out 2 pieces of aluminum foil, big enough to wrap the tilapia in. Place tilapia on foil and drizzle olive oil on both sides. This helps to keep the fish moist and not let it stick to the foil. Grate some ginger over top side of tilapia, squeeze lime juice over fillets, and stick 3 basil leaves under tilapia.
Season with salt and pepper to taste.
I cut the lime into slices and placed it over the tilapia before wrapping, but I would suggest not doing this. Although it looks very beautiful, when cooking in the oven, the rind from the lime overpowers the taste of the tilapia. So definitely save slices for an ending garnish, rather than a cooked in flavor.
Wrap tilapia in foil, but not tight, kind of allow for a tent-like wrapping.
Cook in oven for about 10-15 minutes. Tilapia is a very light fish so it shouldn't take very long at all. Unwrap and serve over cranberry fried rice.
But how do you make the cranberry fried rice you ask? I was getting to that...
Ingredients for Cranberry Bacon Fried Rice:
1 cup long grain brown rice
2 & 1/2 cups chicken broth
1/2 cup cranberries, soaked in white wine
1 small shallot, minced
2 cloves garlic, minced
6 slices chopped bacon
2 tablespoons fresh herbs (I used parsley and basil, with a dash of dried oregano)
salt and pepper to taste
I really like this fried rice recipe mostly because it's a Filipino-style fried rice. What the difference from Chinese fried rice and Filipino fried rice you ask? Well, if you notice, when you go to a Chinese buffet, the rice usually has bits of eggs in it, along with a brown color, from soy sauce, and it's not very "fried". It has somewhat of a soft texture to it.
Well, Filipino fried rice, is actually crispy, but still soft enough to know it's rice. No eggs, no soy sauce. Not in the ones my mom used to make anyway. And this definitely is an upgraded version of my mom's version.
Start by bringing a pot of chicken stock to a boil. Add rice. Cover and let cook for about 30 minutes, when all of rice has soaked up the majority of the stock. Then set aside to cool.
Meanwhile, heat up wok or skillet over medium to high heat and add bacon. Fry bacon for about 2 to 3 minutes, until almost done. Then add shallots and garlic. Saute for about a minute or two.
Add rice. Drain cranberries and reserve some of the wine. Add cranberries to rice and stir thoroughly. If rice seems a bit dry or not to your liking, add some of the wine in, otherwise you can drink it (it's quite tasty!).
Stir in fresh herbs and serve with tilapia!
This was a great meal. The fried rice exceeded all of my expectations and I might have to challenge my mother to a fried rice-off in the near future. The tilapia, like I said, could have been better if I had just left the lime slices off of it until after I plated, but still a good meal!
Labels:
bacon,
basil,
cranberry,
fried rice,
ginger,
lime,
louisville,
steamed,
tilapia
Wednesday, August 5, 2009
Chili-Ginger Chicken w/ Shiitake Mushrooms & Napa Cabbage
I never knew what a good light kit would do for the appeal of my food. I came home this past Sunday after working until 10:30 to a kitchen that looked like something of a t.v. show set. I called Andy while I was on my way home to have him prep the ingredients for that nights dish, and instead he prepped the kitchen for a show... and I can't say that I'm upset, because the pictures turned out amazing, and so did the dish.
Ingredients:
1 tablespoon chili garlic paste
2 tablespoons black bean sauce
2 garlic cloves, minced
1 teaspoon asian sesame oil
3/4 cup chicken stock
3 tablespoons vegetable oil
1 & 1/4 lb. chicken thighs, cut into 1 & 1/2 inch strips
salt
freshly ground black pepper
1/2 lb. shiitake mushrooms, stems removed and cut into pieces
2 tablespoons minced ginger
3/4 lb. napa cabbage, chopped (4 cups)
3 ounces daikon radish, thinly sliced
2 scallions, thinly sliced
The original recipe I found had miso paste in it, and after searching all over Louisville (not really, I only stopped at Kroger and Whole Foods), with no luck, I decided to substitute the chili paste and black bean sauce to give it more of a subtle spicy flavor.
In a small bowl, mix together chili paste, black bean sauce, garlic, sesame oil, and 1/2 cup of the stock.
Heat vegetable oil in wok and add chicken thighs. Salt and pepper to taste and cook until done, about 5 minutes or so.
Remove from wok with slotted spoon and set aside.
Add mushrooms, ginger (instead of mincing my ginger, I had it in the freezer and grated it instead. The freezing of the ginger root keeps it fresh longer, and it just easily grates so I like it better that way), and remaining chicken stock to wok. Cook until mushrooms are tender.
Add the cabbage and chicken back in. Stir fry for a quick minute and add the savory sauce to the wok.
Allow to simmer and finally add in daikon and scallions.
Mix together and serve! Enjoy!
Tuesday, August 4, 2009
Pork Stir-Fry
For the past couple of Sunday's, I've been experimenting with Food & Wine's May 2009 issue of stir fries. Stir Fries are definitely something that can be quick, tasty, and most importantly... versatile. You can put practically anything in a wok and call it a stir fry. Protein, vegetables, tasty sauce, and you have stir fry! The possibilities are endless.
So for today's recipe, I've got a really simple, but quite tasty Pork Stir-Fry.
Ingredients: (adapted from Food & Wine May 2009 - Pork-and-Tofu Stir Fry)
3 tablespoons vegetable oil
1 lb. pork loin, cut into 1 & 1/2-by-1/4 inch strips
salt and freshly ground black pepper
3 cloves of garlic
large pinch of crushed red pepper
1 large leek, halved and cut into 1 inch pieces (the grocery was out of leeks, so I substituted an onion and did a rough chop)
1 cup chicken stock or low sodium broth
1/2 lb firm tofu cut into 1 in. cubes (I omitted the tofu)
1/4 cup hoisin sauce
2 teaspoons sherry vinegar (I used sherry wine instead, less acidity, but still a flavor boost)
1/2 teaspoon asian sesame oil
And although this seems hypocritical, because I'm pretty much the poster child for trying everything once and appreciating ALL foods, I just can't bring myself to love tofu. No, it's never even been close to my mouth or my lips, and frankly, I don't plan on it doing so. I know, I know, I should be the last person to turn something down without trying it first, but honestly, it gives me the heebie jeebies. And I'm cooking the meal and I can put what I want it. But if you like tofu, more power to you, and that's why I kept it in the list of ingredients!
And so after that derailment of a rant, on to the quick and easy preparation...
Heat 1 tablespoon of the oil in a large skillet or wok. Add pork and cook until done, about 5 to 10 minutes, depending on how thick you cut your pork. I went a little meaty with my strips, but thinner strips would take less time. Transfer pork to a plate and set aside.
Add remainder of vegetable oil in skillet. Add garlic and red pepper to oil and heat for about 1 minute. This allows the oil to get a crisp garlic flavor and a little bit of heat from the pepper. Add leek (or onion, in my case), 1/4 cup of stock, and cover until leek or onion is cooked and soft, about 2-5 minutes.
Add remainder of stock and bring to simmer. Add tofu (we also contemplated substituting the tofu for chicken, but we had a ton of pork to begin with and didn't want to waste all that meat). Also add pork back in and stir in hoisin sauce, vinegar (or wine), and sesame oil.
And you're done! We served ours on a bed of brown rice and it was just the thing to soak up the extra sauce on the plate. It was tasty, easy, and great the next day for lunch! Enjoy!
Subscribe to:
Posts (Atom)