Happy Thursday guys! I'm absolutely exhausted from this week already! And I've got to work through Saturday before I get to have my "weekend"! Hopefully I'll make it.
I'm pretty stoked that tonight - in about 30 minutes, the official NFL regular season starts! Football season is probably my favorite time of year. Go Eagles! And as an avid Peyton Manning-hater... I'm glad the sad little puppy dog is sitting out for a couple of months, but I digress.
Let's talk peanut butter. I've found a new love. Move over JIF (I keep it old school), I've got a new favorite. And I'm pretty sure I'm late on this bandwagon, too. But better late than never! Peanut Butter & Co. Bee's Knees is the SHIZ! I find myself just eating spoonfuls throughout the day because it's so good. So I knew that using up the last bit of it in this bread was bittersweet because I'd be using up the last of it (I can always restock right?!), but also genius, because when you use good ingredients, good things happen right? Right!
Ingredients: Adapted from the 1945 Edition of The Boston Cooking School Cook Book
2 cups flour 1/3 cup sugar 2 teaspoons baking powder 1 teaspoon salt 3/4 cup peanut butter (I highly recommend using PB&Co!) 1 egg, beaten 1 cup milk
Glaze:
1 tablespoon heavy cream 2/3 cup powdered sugar 1 tablespoon peanut butter
Preheat oven to 350 F.
In a large bowl, combine flour, sugar, baking powder, and salt. Using a fork, incorporate peanut butter and beaten egg. Stir in milk until a smooth batter is formed.
Grease a loaf pan and pour in batter. Bake for about 50 minutes, or until toothpick comes out clean.
Let rest on a cooling rack for about 10 minutes, or until cool enough to handle.
To make glaze, combine cream, powdered sugar, and peanut butter until smooth.
Remove bread from pan and pour glaze over top.
This was pretty tasty. If you're a peanut butter lover, you'd definitely love this! It's something I don't see a lot of - especially when zucchini breads are so popular right now! Hey... zucchini peanut butter bread - I think I may be on to something. I'll experiment and get back to you guys!
Happy Monday! It's that time again, Secret Recipe Club reveal!
What is Secret Recipe Club? Well, it's the brainchild of Amanda from Amanda's Cookin'. You are assigned a "secret" blog to cook one dish from and post on the given reveal date.
I love how the group has just grown so much since I first joined! This will be my third SRC post and definitely not my last! I just love discovering new blogs to ogle over!
Andy was being especially good, so I thought I'd treat him to a special treat. I picked Edesia's Peanut Butter Crunch Brownies a.k.a. Better Than Crack Brownies. I mean, chocolate & Reese Cups? Two of Andy's favorite things combined into one stellar brownie. And it couldn't be easier to put together either! Let's get to it!
1 box brownie mix (I used Ghirardelli Dark Chocolate) 1 egg 1/4 cup water 1/2 cup vegetable oil about 8 Reese's peanut butter cups, roughly chopped 1/2 cup salted peanuts, chopped 1 cup semi-sweet chocolate chips 1 tbsp butter 1 & 1/2 cups creamy peanut butter (I used PB & Co.'s Bees Knees) 1 & 1/2 cups Rice Krispies cereal
Make the brownies as directed on the box in a 9x13” pan. Bake for 20 to 25 minutes.
Remove the brownies from the oven and top with the peanut butter cups and peanuts. Place the brownies back into the oven and bake an additional 6 to 10 minutes or until a toothpick can be inserted and comes out clean. Remove the brownies from the oven.
In a microwave safe dish, melt the chocolate chips, butter, and peanut butter for about 45 seconds. Stir until smooth. Then stir in the Rice Krispies.
Pour the Rice Krispies mixture over the brownies and let cool. Refrigerate for at least two hours until serving. This was definitely the hardest part because I totally wanted to dig straight into them! But trust me, well worth the wait!
Okay, these were seriously one of the best brownies ever. I even tried to take some leftovers to work and Andy practically held them hostage. So yeah, they were THAT good.
I had a friend over for dinner that night and gave him a couple to take home for his roommates - Andy didn't see me do this and when he noticed a couple brownie slices were missing, he definitely interrogated me until I confessed. I didn't know he was keeping track - duly noted for next time.
I got a text later on in the week that read "umm, (roommate's name) says that brownie was better than crack". I don't want to know how they know this, but hey - I take it as a compliment.
So yeah, trust me - you want to make yourself a batch of these babies. But I can't promise that you'll want to share them. Ask Andy.
TGIF! You know how excited Fridays make me. I've just 8 hours of work to get through and then the weekend is mine to conquer!
And you didn't think I'd leave you empty-handed for Valentine's Day did you? Andy received these a week early, so he's been slowly munching on them. They've made him a very happy camper, let me tell you. He even almost threatened me, as I was taking a few of them to work! But I had to explain to him that I am the boss, especially since I made them. So I can choose who receives them! Hehe. He straightened up after that. =)
So browsing the internet last weekend, I came across Mary's, over at One Perfect Bite, recipe for a Chocolate Peanut Butter Torte. My mouth was drooling and I was faced with the decision of whether to make a large torte, like Mary's, or make miniature versions to share (and of course portion control!). It was obvious, I needed to miniaturize this beauty, and that's exactly what I did!
So whether you make these for your Valentine, yourself, or just the random guy/gal walking his/her dog down the street. I urge you. Make them. They will instantly brighten your mood, and are definitely not Valentine's Day specific. Chocolate and Peanut Butter are a combination deemed fitting for any day of the year!
Oh, and don't forget this week's poll at the bottom!
Ingredients: Adapted from One Perfect Bite's Recipe
For Crust:
1-2 packages chocolate graham crackers (about 10-15)
1/3 cup unsalted butter, melted and cooled pinch of salt
1/2 cup heavy cream 1/2 cup bittersweet chocolate, chopped
Start by making your crust. Preheat oven to 350 F and line a muffin tin with cupcake liners.
Add chocolate graham crackers to bowl of food processor and pulse until finely ground. In a small bowl, combine graham crackers, melted butter, and salt. Mix until the crumbs stick together nicely.
Press mixture into a thin layer covering bottom and sides of cupcake liners. Freeze crust for 10 minutes.
Bake for 10 minutes and then transfer to a wire rack and let cool completely before filling.
For the filling, place 1/2 cup of peanuts, peanut butter chips, chocolate chips, sugar, espresso powder, cinnamon and nutmeg in the bowl of your food processor. Pulse until peanuts and chips are in little pieces. Transfer mixture to a bowl and set aside.
In a separate medium-sized bowl, whip 2 cups of heavy cream until it holds medium peaks. Slowly add 1/4 cup of powdered sugar and whip until cream holds medium-firm peaks. Transfer whipped cream to fridge until needed.
In a large bowl, beat cream cheese with remaining 1 cup of powdered sugar until cream cheese is smooth. Add in peanut butter, whole milk, and 1/4 cup of chopped peanuts and mix until well combined.
Gently fold in about 1/4 of whipped cream to lighten the mixture. Stir in chocolate chip & peanut mixture. Then slowly fold in remaining whipped cream.
Fill each cupcake liner about 3/4 full of filling. Refrigerate for about 3 hours, or until filling is set.
For chocolate ganache topping, carefully melt remaining chocolate chips in microwave-safe bowl in 30 second intervals. When chocolate is melted, pour in heavy cream, and mix until combined with chocolate.
Pour chocolate over each mini tart and smoothing with a spoon, if desired. Chop remaining 1/2 cup of peanuts and scatter over top of tarts. Chill for at least 20 minutes, or until chocolate is set.
Then try to resist these. It's damn nearly impossible. Well... in our household anyway. Hope you guys have a great weekend, with whatever you do!
So what should I make Andy for Valentine's Day this weekend?
Yes, this day has finally come! I know some of you may not have thought I'd post this, but I promised you I would! Better late than never, right?
I even thought, at one point, that I had ruined this cake. I blame it on the short cat nap I took while the cake portion was in the oven. Thank goodness for internal time clocks, though!
I've convinced myself that I need to do more baking, and I thought you guys could help me out! Pretty please? So anyway, once or twice a month, (maybe more if I'm (or Andy) is feeling an extra sweet tooth) I'll have a poll up with ingredients. You choose the ingredient you'd most like to see in a dessert and I'll surprise you guys with a dessert the following week. Good deal, eh? You'll find this upcoming week's poll at the end of this post.
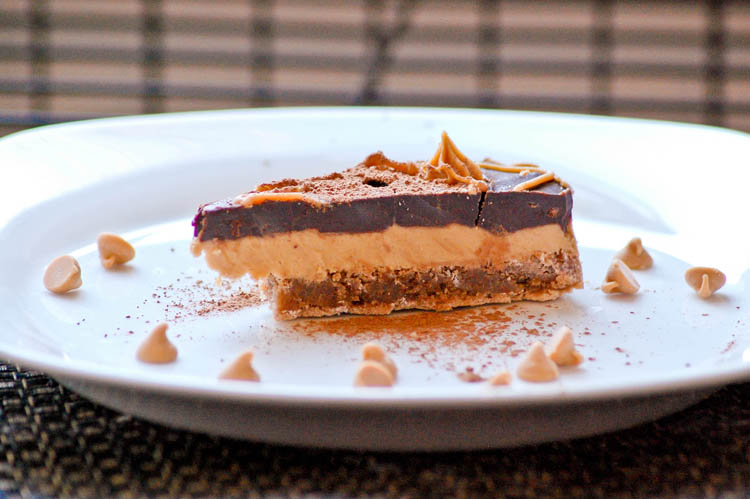
But first, we must talk about buckeye cake!
So who knows what a buckeye is? (:::Looking around:::) Okay, some of you. Well... let's get a little history lesson for those of you who don't know, maybe you do know, but just didn't know it was called a Buckeye?
Okay, well a Buckeye tree is native to Ohio and has these nuts on them, that well... look like a male deer's (also known as a buck) eye. So that's the nut up above.
Well, some creative dessert geniuses decided to make something even better, that resembled the look of a Buckeye nut. If you look at the picture above, it looks like peanut butter in the center and chocolate surrounding it, right? And that's exactly what a Buckeye is! Chocolate dipped peanut butter balls. And they're pretty much awesome.
So wouldn't it be even more awesome to turn this into a cake? Uhh... hell yeah it would! So thanks to a Nestle Tollhouse recipe, this creation actually exists!
Ingredients: Adapted from Nestle Tollhouse's Recipe
Cake Layer
2 eggs 1 & 1/4 cup sugar 3/4 cup flour 6 tablespoons unsalted butter, melted 1/2 to 1 cup (depending on how chocolatey you want it!) unsweetened/dark chocolate, melted 1/2 teaspoon vanilla 1/8 teaspoon salt
Peanut Butter Layer
3/4 cup peanut butter 1/4 cup unsalted butter, softened 1/4 teaspoon vanilla 3/4 cup powdered sugar
Chocolate Ganache Layer
1 cup heavy whipping cream 2 cups dark chocolate chips
1/3 cup peanut butter chips
Preheat oven to 350º F.
Grease 9-inch-round spring form pan (you could use a cake pan, but unfortunately I don't have one of those). Line the bottom of pan with parchment paper and grease that, as well.
For the Cake: Combine eggs and sugar in large bowl. Stir in flour, melted butter, melted chocolate, vanilla extract and salt until smooth. Pour into prepared pan.
Bake for 25 minutes or until a wooden pick inserted in the middle comes out clean. I'm pretty sure I just dozed off for a couple minutes after the timer went off, so my cake came out a little more like a cookie, than a cake... but it worked out for the best! Cool on wire rack for 5 minutes. Run a knife around edge of cake and cool for an additional 10 minutes. Invert cake onto serving platter. Remove pan and carefully peel off parchment. Cool cake/cookie completely.
For the Peanut Butter Layer: Beat peanut butter, butter and vanilla in a medium bowl until combined. Gradually beat in powdered sugar. Spread mixture on cake. Refrigerate for 30 minutes.
For the Ganache: Heat cream in small saucepan to boiling and then remove from heat. Add dark chocolate morsels and let stand for 5 minutes. Stir until smooth. Refrigerate for 30 minutes or until mixture is spreadable. Spread chocolate on top and sides of cake.
Melt the peanut butter chips in a small heatproof bowl in microwave, about 30 seconds. Spoon mixture into a piping bag. Decorate cake as you wish (in my case, some Happy Birthday and star bits) Not bad for my first cursive cake decorating, eh? I could definitely use some work (notice the "a" and "y") Store in refrigerator until set. Let stand for 30 minutes before serving.
And there you have it... the most enjoyable cake Andy has ever put in it mouth. And I'm not just saying that... he told me so!!
Notice our creeper dog eying that peanut butter!
Oh, and here's the poll guys! I'll probably post the dessert recipe either on Wednesday or Friday of next week!!