Showing posts with label onions. Show all posts

Friday, October 28, 2011

How-To: Dice an Onion

So I asked if you guys wanted some knife skills posts and there was a resounding yes!  I'm glad you guys are excited - because I love having an excuse to bust out my knife set!

Anyway, this may seem like a roll-your-eyes kind of post because I'm sure many of you know how to cut up an onion.  But if maybe you're like me (before culinary school), you may just roughly chop and not try to get it too precise.  I've noticed that since I've been in school (5 weeks already and I feel like I've learned such a vast array of tasks!), I find myself wanting perfect and symmetric everything.  It's getting to be a little OCD almost.

So I chose to show how to dice up an onion because I practically use an onion for almost every dish I cook.  It's crazy when you think about it, you know?  So we'll ease into something easy, and then I'm open to taking suggestions for future knife-cut how to's (anything in particular you guys want to learn how to do?  If I don't already know how to do it, we'll learn together!).

You won't need anything fancy.  Just an onion, a (really sharp) chef's knife, and a cutting board.


Honestly, you want to have a really sharp knife.  You're more apt to cut yourself with a dull knife than a sharp one.  So invest in a whetstone if you don't already have one (they average about $10 and last a really long time, so there's no reason to not have one).

And another thing, don't "saw" at anything.  You want to strive for one fluid motion through whatever you're cutting.  No back and forth action. 

So you'll want to take your whole onion and before you peel it, cut it in half, from the root to the top.  Then peel your onion.  Set the onion flat and make a diagonal cut to trim off the top. 


So now you're left with the top (which you can just pitch) and the rest of the onion. 


You'll want to put the heel of your palm on the top of the onion (or make a fist and put the tops of your knuckles on the top of the onion) to hold it in place.  Starting with the bottom edge of your knife, you want to make one fluid horizontal slice (about 1/4 inch from the bottom of the onion), pulling the knife closer to you as you cut and ending just before the root - no sawing motions, so this is why it's very important you have a really sharp knife! You want to keep your onion in tact, so make sure not to cut through the root! 

You'll just want to slide your knife through, and if you don't make it close enough to the root, it's okay - no biggie
Then you'll go up about 1/4 inch from your first cut and make another horizontal cut the same way.


Depending on how big your onion half is, you might be able to get one or two more 1/4 inch-spaced horizontal slices.  I think I did one more with this one.

Next you'll want to turn the onion 90 degrees (so that the root end is at the north end).  Then you'll make a vertical cut (about 1/4 inch from the left or right, it doesn't matter which end you start).  Remember, you don't want to go all the way through, cut before the root so your onion still stays in tact.


If you want, you can hold the sides of the onion together so it's easier to cut, just watch your fingers and be careful!  Space the vertical cuts about 1/4 inch apart (we're going for consistency here, right?)  I think I got about 5 or 6 vertical cuts.


After you make your vertical cuts, you'll want to turn the onion back 90 degrees (whether you're left or right handed, it doesn't matter, my root end was to the right because I'm left handed).

The key to an even chop is to have a stable, sharp knife.  Make one fluid cut.  No sawing.  I know I've said that a million times, but seriously.  Having my chef say it over and over made a difference with me and a lot of the other of the students.  I used to be a "sawer".  I'll admit it.  But I can't go cutting anything like that any more, regardless of what it is!

Anyway, make sure the tip of your knife is on the cutting board (in front of the onion, and just bring your knife down to make a vertical cut - 1/4 inch spacing!).

Stragglers are okay - no biggie
Continue to make 1/4 inch-spaced vertical cuts until you get to the root.

Don't hold the onion or knife like I did (I have no idea why I'm doing that lol) - you're apt to cut yourself
And voila - you've small diced (1/4 x 1/4 x 1/4) an onion.  Of course, an onion is round and layered and you can't really get a perfect 1/4 inch perfect cube, but it's close enough! 


I'll hopefully pop in during the weekend (can't make promises!), but if not, we've got Espagnole sauce next sometime next week!  And if you have any knife cuts you want to learn - let me know and I'll try to feature them next!

Have a great weekend guys =)

Monday, August 29, 2011

Secret Recipe Club: Fish Tacos


I know what you're thinking.  I already had my turn.  I was in Group A that posted earlier this month for The Secret Recipe Club.  Now I'm just being greedy.

But no, I'm actually being helpful!  I got an e-mail at the beginning of the month, that somebody from Group C had backed out, leaving a blogger without a "Secret" partner.  And being that last month, I happened to be a blogger that had someone back out on me (and thank goodness Winnie from Healthy Green Kitchen stepped up to volunteer to do another post - she's awesome!), I knew I had to step up and pay it forward!

And it turns out I got one of my favorite blogs - Kelly from Eat Yourself Skinny!  Everything always looks good on Kelly's blog, whether it be her Grilled Chicken Thighs with Pineapple, Corn, and Bell Pepper Salsa or her Watermelon Martinis - there's something for everyone there.  And you know what the best part is?  Most, if not all, of Kelly's recipes are absolutely figure friendly and healthy for you!  You know how I know?  She includes all of the nutritional info with all of her posts, which is always helpful!

With so many choices, it was hard to pick what to make - but I eventually settled on her Sauteed Tilapia Tacos w/ Grilled Peppers & Onions.  Fish tacos are my absolute fave, and I believe it is essential that they grace everyone's table at least once during the summer!  I made a couple small changes, just based on things that I already had on hand - I used flounder as my fish and utilized my purple peppers from our CSA, as well as adding a little Asian flare with the Ginger Miso dressing (I'm obsessed right now!).

Ingredients:
Adapted from Eat Yourself Skinny's recipe


1 small onion, sliced
2 purple bell peppers, sliced
2 tablespoons olive oil
salt and pepper, to taste
2 large flounder fillets (about 1/2 lb.)
6 corn tortillas
Ginger Miso Dressing (I bought some from a local sushi joint - but you could easily make your own!)

Heat 1 tablespoon olive oil in a large skillet under medium high heat.  Add onions and bell pepper and cook until starting to soften, about 6-8 minutes.  Season with salt and pepper.  Remove from skillet and set aside.

Season flounder on both sides with salt and pepper.  Heat remaining tablespoon of olive oil in the same skillet used for onions and bell pepper (if needed) under medium high heat.  Add flounder and cook for about 3-4 minutes per side, or until fish is white throughout.

Place tortillas on a microwave-safe plate and cover with a semi-damp paper towel.  Microwave for about 15 seconds, or until warm.

Flake off the flounder and divide amongst the tortillas.  Top with onion and bell pepper mixture.  Then add a little bit of ginger miso dressing on top, if desired.  Fold up and enjoy!

These were seriously delicious!  And I felt good eating them!  Although, my changes probably made them a little less healthy than Kelly's.


And funny story about these tacos.  I had eaten 2 out of the 3 when I had to get up from the table and get something from another room.  When I came back, my last taco was gone.  I looked at Andy and said "where's my taco?!"  He shrugged his shoulders, and then we both saw Zappa (one of our dogs), licking his chops on his bed, and a little piece of corn tortilla by his paw - the dog stole my taco!  And apparently he liked it too!

Anyway, these were tasty, and I can't wait to try more goodies from Kelly's blog!

Want to join in all the fun?  To find out how, check out The Secret Recipe Club!


Monday, June 27, 2011

Restaurant Recreations: Granny's Apron


It's been a while since I've done a Restaurant Recreations post, so I figured I'd start the week with one!

Now, a while back, I posted on my Facebook page that I would be trekking around Louisville to find a hole-in-the-wall diner to try.  Upon just seeing the name of this place - Granny's Apron - we knew we had to give it a go.

The restaurant itself is pretty inconspicuous, it's basically a plain brick building - you wouldn't really know it's a restaurant unless you already knew it was there.

We walked in and were promptly seated.  The restaurant was about half full, so you know that something had to bring them there.  One look at the menu and it was a hard decision to pick what we wanted.  They have all your basic comfort foods, from country fried steak to meatloaf.  We decided to do two appetizers, the onion petals and some mozzarella cheese sticks.

The onion petals tasted like a spicy version of a bloomin' onion, and were served with a sauce very similar to bloomin' onion sauce.  They were tasty though.

The mozzarella cheesesticks wern't anything fancy - in fact, they probably came from a frozen package - but hey, we weren't anywhere fancy, so I didn't expect anything more.

For our entrees, Andy chose the fish sandwich and I chose the prime rib burger.

Now let's talk about this fish sandwich.  This thing was huge.  I mean - HUGE.  4 people could have eaten off of this.  And the kicker here?  The sandwich was like $6!  After the sheer shock factor of how big this thing was, Andy said the taste of the fish itself wasn't anything spectacular.

Seriously huge!
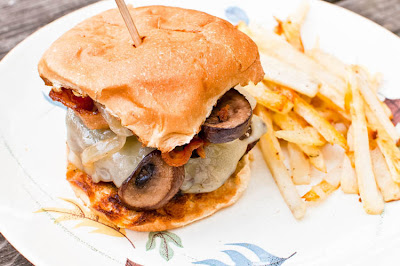
There was pretty much only one word for my burger - messy!  It was juicy though!  It had sauteed mushroom and onions on it, as well as some swiss cheese.  Then to top it all off, there was a boatload of gravy on top.  It was definitely way too messy.

Sorry about the blurry picture - but you can obviously see this thing was messy!
All in all, our meal was okay.  It wasn't anything spectacular, but for under $20, we got your typical diner food - and let's not even talk about the "entertainment" we received while people-watching.

Granny's Apron on Urbanspoon

So let's get to the recreation!

I liked the idea of my burger, loaded with goods, but the restaurant version was way too messy!  So I decided to "clean" it up a little bit and here's what I ended up with...

Ingredients:


1 lb. lean ground beef
8 oz. portobello mushrooms, sliced
1 small onion, sliced
6 tablespoons orange juice
2 tablespoons soy sauce
2 tablespoons olive oil
2 tablespoons apple cider vinegar
4 slices bacon, cooked and divided
Hamburger buns
Swiss cheese slices

Heat a large skillet under medium high heat and add 1 tablespoon of olive oil.  Add mushrooms and onions and cook until softened and slightly caramelized, about 10-15 minutes.

In a medium bowl, combine the beef, orange juice, soy sauce, olive oil, apple cider vinegar.  Chop up 2 slices of bacon and gently combine in the mix, as well.

Form mixture into 8 patties and season liberally with salt and pepper.

Heat a charcoal grill under medium high heat.  Grill patties for about 4 to 5 minutes per side (for a medium rare), or until at desired doneness.  About a minute before burgers are done, add cheese slices on top (if desired) and cook until melted.

Assemble burgers and top with onions, mushrooms, and leftover bacon slices. 

These were extremely juicy burgers!  I don't normally include a lot of acidity like orange juice or vinegar in burger mixtures, but it really worked here.  And you could taste a slight orange flavor in the meat which was a welcomed change!

The burgers were still slightly messy, but manageable, due to the fact that I decided to omit the gravy.

Give these burgers a try for your next grilling adventure and you won't be disappointed!


Have a great Monday guys!

Friday, May 13, 2011

Springtime Salsa


Hey guys!  Happy Friday to ya!  Am I ever happy for this week to be over with!  It's just been quite hellish, to tell you the truth.  And after my shift tomorrow morning, I'll have Sunday and Monday off, so I'm definitely looking forward to some rest!

On a side note - sorry if any of you tried to visit the blog the past day or so - Blogger was apparently working out some kinks and removed Wednesday's & Thursday's post amidst all the craziness!  They're back now though, so all is (seemingly) back to normal!

Anyway, no big plans for the weekend - just relaxing!  How about you guys?

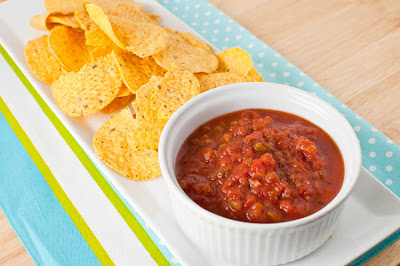
I know I'll be finishing off this salsa, because it was super delicious!  Next time, I'll probably make my own tortilla chips, though - has anyone noticed that store-bought tortilla chips just keep getting saltier and saltier?  I felt like I was eating a salt lick by eating the ones pictures with the salsa! 

Ingredients:


28 oz. can whole tomatoes, with juice 
1-2 jalapeno peppers (depending on how spicy you want it! - I only removed half of the seeds, I live on the edge!)
1/2 small onion
small handful cilantro
salt and pepper, to taste

In the bowl of a food processor, combine tomatoes, jalapeno peppers, onion, and cilantro.  Puree until smooth (or keep it chunky - it's your salsa, get it to your liking!).  Season with salt and pepper, to taste. 


Bam!  You've got yourself salsa in about 10 minutes.  Seriously, I'll be eating salsa with everything now that the weather is warm and sunny!  It's just one of those "sunshine" foods, don't you think?  And of course, you could always use fresh tomatoes - but it's still a little too early for my garden beauties, and I just had a can in the pantry, so I said why not?


What's your favorite way to make salsa?

Anyway, sorry for the short and simple posts this week!  I'm still working on getting the congestion out of my head from being sick and it's just easier to do simple things right now!  So I promise I'll be back Monday with some awesome stuff (esp. Derby Pie Fudge!!)

Have a great weekend guys!

Wednesday, March 16, 2011

Pot Roast w/ Red Wine Gravy

Served piping hot!
I've started a wine bottle collection.  I have this genius idea that I'm going to incorporate them into our wedding table decor, but I haven't the slightest idea of how to do so.  I keep going back and forth with whether I want to just simply put some flowers in them, some candles, some sticks - who knows.  But I do know that I'm starting to not have any room for these wine bottles. Seriously, I've got over 100+ in random closets/pantries around the house.

And before you guys gather together and hold an intervention in my honor, I didn't drink all of the wine in those bottles.  My friends did.  Hehe.

But besides empty wine bottles, I also have a bunch of almost full ones in our bar area.  Lots of half-drunk red wine bottles.  I'm a white wine drinker, myself.  I don't mind red wine, but it's just not my preference.  So I end up opening them, drinking a glass, and forgetting about them.

So what to do with all of that red wine?  Hmm, I cook practically 7 days a week, so why not use them in some dinners!  Why was is not that obvious before?  Yeah, sometimes the things you need are right in front of you.  First thing I thought of to use that red wine was pot roast!  Red meat and red wine just can't be beat.

Ingredients:


2 lb. beef chuck roast
1 tablespoon olive oil
1 & 1/2 cups red wine (I used a Merlot)
2 & 1/2 cups beef stock
1 large onion, sliced
8 oz. sliced mushrooms
10 slices of bacon, chopped
1/2 cup flour
salt and pepper, to taste
1 teaspoon onion powder
1 teaspoon garlic powder
1/2 teaspoon thyme
1/4 teaspoon cayenne pepper

Place roast in a large plastic bag and pour red wine in with it.  Seal bag tightly and let marinate in fridge for about 3 hours.

Remove roast from bag and pat dry, reserving the wine.

Plug in your crockpot and turn it to the high setting.  Pour beef stock, sliced onions, and mushrooms into crockpot.

In a large skillet, heat 1 tablespoon of olive oil under medium high heat.  Add roast and sear, about 2-3 minutes per side.  Remove roast from pan and set aside on a plate.

In same skillet, add chopped bacon and fry for about 8-10 minutes, or until bacon is browned.  Remove bacon from skillet with a slotted spoon and dry on a paper towel-lined plate.  Once dry, add bacon to crockpot.

Stir in flour, onion powder, garlic powder, and cayenne pepper to liquid in crockpot.  Mix until flour is dissolved and no clumps are present.  Add roast to crockpot and pour remaining red wine from marinade over top.  Sprinkle thyme over roast and season with salt and pepper, if desired.

Let cook in crockpot for about 6 to 8 hours, or until roast is tender and falls apart when cut with a fork.  Serve with mashed potatoes or other comforting side dish.


This was one flavorful gravy.  And you all remember my love for gravy right?  Andy loved this too.  He's not normally one for leftovers, but he made sure he had some set aside for his lunch today.  This isn't traditionally Irish or anything, but it could definitely sub in for a comforting St. Patty's Day meal!  Enjoy your Wednesday guys!

Monday, December 27, 2010

I-Want-My-Warm-Weather-Back Burgers


Hope everyone that celebrated had a festive and amazing Christmas!  I know I did, and I felt extremely loved and surrounded by great family!

I complain when it's too cold.  I complain when it's too hot.  Am I ever satisfied?

Although we didn't get hit quite as bad as the East Coast, Louisville had it's fair share of snow.  We had a white Christmas, which was quite pretty, but enough already.  The snow is cold.  And my dogs are possessed with the devil when they see it.  All they want to do is run around, tugging fiercely on their leashes, making me look like an idiot ragdoll when taking them for walks.  I'm sure it's quite humorous to an onlooker, but to me... it just makes my arms hurt.  And I might have a case of whiplash.  Who knows.

Anyway, I made these burgers with summer in mind.  Although I didn't brave the cold and grill them on the back deck (I'm sure they would have been even better with that smoky grill taste!), they were quite possibly the juiciest burgers I've had in a while.  Andy definitely liked them, as he proceeded to eat two!

Ingredients:
Adapted from The British Larder's Recipe


Burgers:
 
1/2 lb. ground beef
1 onion, diced
1 carrot, peeled and grated
1 tablespoon olive oil
4 cloves of garlic, roasted and mashed
salt and pepper, to taste
1 tablespoon horseradish sauce
1 egg
1/4 cup panko breadcrumbs
1 tablespoon worcestershire sauce

Parsnip Fries:

2 parsnips, peeled and cut into fries
2 tablespoons olive oil
2 tablespoons honey
Salt and Pepper, to taste
1/4 teaspoon cayenne pepper


Preheat oven to 400 F.
Toss parsnips in a large bowl with olive oil, salt, pepper, and cayenne.  Arrange in 1 layer on a baking sheet and roast in oven for about 30-40 minutes, or until parsnips are crispy and browned.  

Heat olive oil in a large frying pan under medium high heat. Add onion and carrot and saute for until onions are soft and translucent, about 2-3 minutes.  Season with salt and pepper. Turn heat off and cool completely.  Then mix in roasted mashed garlic.

In a large bowl, combine onion mixture with ground beef, horseradish sauce, egg, panko, and worcestershire sauce.  Mix well.

Form mixture into 4 decent sized patties (you can make more of smaller ones, if you'd like).  Season outside of patties with salt and pepper, if desired.

Heat frying pan under medium high heat and add a little bit of olive oil.  Cook the burgers for 5 minutes on each side, or under middle is no longer bright pink.

Right before burger is done, you can add some cheddar cheese to melt on one side if you'd like a cheeseburger!

When parsnips are done, drizzle them with honey and serve with burger!

 
Like I said, these were damn good and juicy!  It definitely reminded me of grilling out (although these weren't grilled) in the summertime.  I want my summer/spring back.  Soon enough!

Enjoy guys!

Wednesday, April 21, 2010

Cream of Mushroom & Chicken Soup


Okay, so first off... I've been noticing a lot of blogs I read (whether about food, politics, everyday life, etc.) sometimes have "theme-days"... so in spirit of all of that... I've decided to make Fridays from now on, FYI Food Science Fridays. What will it pertain, you ask? Well... every Friday, before my recipe, I'm going to give an overview of a journal or research article that pertains to Food Science or Technology.

I do this for 2 major reasons.
#1. I've officially decided I'm going to finish up my Biology degree and then go to grad school for Food Science. So it would benefit me to keep up to date with current research and experiments being conducted to be more familiar with what I'm getting myself into, and to just see what's being done.

#2. I think the scientific part of food development is overlooked. There's so many things out there that you wonder, what does that mean? why is this so? So hopefully, the articles I go over are going to give you a little bit of insight into what you're putting into your mouth and how it even got to you in the first place.

I'm hoping the pieces will be interesting and spark some comments, and hell... who knows, you may be on Jeopardy one day and your Final Jeopardy question may be something you learned from one of my articles. I've already read what I'll be talking about on Friday and I'm not letting you in on anything quite yet, so you'll just have to sneak a peak back on Friday afternoon to find out the interesting tid bit.

Anyway, on to the recipe...

Ingredients:

8-12 oz. button mushrooms, sliced
1 tablespoon olive oil
1 onion, chopped
2 garlic cloves, minced
salt and pepper to taste
2 cups chicken broth
1 cup heavy whipping cream
2-3 cooked chicken thighs, skin and bones removed, then shredded

The one thing I love about cream of anything soup is that the prep work doesn't usually involve fine chopping, because at the end of day, you're just going to blend the whole thing up to get a nice smooth consistency anyway, so I wouldn't worry too much about slicing or chopping.

Heat a dutch oven over high heat. Add the olive oil and when shimmering stir in the mushrooms, garlic, and onions. Saute until the mushrooms start to become soft, about 5 minutes.

Season the mushroom mixture with salt and pepper to taste. Add in the chicken broth and cream. Cover and bring the mixture to a boil. Reduce the heat and simmer until the mushrooms are completely tender, about 8-10 minutes.

Puree the soup with an immersion blender until smooth or at a texture you prefer. Stir in shredded chicken and season with salt and pepper if needed. Ladle into bowls and serve!

I loved this because it was so quick and easy... and flavorful to the extreme! This could even be put on top of pasta or chicken breasts it was so good. I may even use this for the next time I make green bean casserole! Enjoy! And don't forget to come back Friday for the first installment of FYI Food Science Friday!

Friday, March 12, 2010

Sirloin Steak w/ Stir Fried Peas and Red Rice


I've got a throbbing headache. Hopefully, as I write this post, the Ibuprofen will do its job and it will throb less as I keep typing. Key word = hopefully. This week has just been full of great weather... until today, of course. It rained like it's never rained before (or at least so far this year). and I'm pretty sure it will continue to rain all weekend, which is a shame because I would really like to get out there and play tennis again. So here's hoping the weatherman is wrong, and don't forget to set your clocks FORWARD on Sunday!

Ingredients:
Adapted from Food & Wine's March 2010 issue: 'Stir Fried Red Rice w/ Sliced Sirloin Steak & Peas'

1/2 cup red rice (I found this at Whole Foods)
1 cup water
3 tablespoons vegetable oil
2 garlic cloves, minced
1 lb. sirloin steak, sliced thinly
salt and white pepper, to taste
1 onion, sliced thinly
1 tablespoon fresh ginger, minced
2 cups each of chopped kale and swiss chard
1 cup thawed frozen peas
3 tablespoons soy sauce
small handful chopped cilantro
juice from 1 lime

In a small pot, cover the rice with water and bring to a boil. Cover and turn down to low for about 25-30 minutes, when most of the water has been taken up by the rice. You could definitely use white rice if you wanted to for this, but I think the red rice gives it a somewhat sweet aspect. Not sugary sweet, but just sweeter than your normal rice I suppose.

When rice is finished, spread onto a baking sheet to cool.

In a large skillet, heat up 1 tablespoon of the oil under medium high heat. Add the garlic and saute until fragrant, about 1 minute. Be careful not to let the garlic burn, so stir constantly.

Season the sirloin strips with salt and add to the skillet with the garlic. Brown each side, about 1-2 minutes per side (depending on how thick you cut your slices) and then transfer to a plate.

Heat remaining oil in skillet and add the onion and ginger. Cook until onion is soft and translucent, about 5-7 minutes. Stir in the kale and swiss chard and cook until wilted, about 1 or 2 more minutes. Then stir in the red rice, peas, and soy sauce. Add back in the sirloin strips, as well. Mix well and heat through. Season with salt and white pepper to taste. Stir in some of the cilantro and squeeze the lime juice over mixture. Mix well again. Serve while its hot!

This was great because it was like having everything incorporated into one. The sirloin was evenly distributed among all of the vegetables and there was a good ratio of rice. The red rice was really interesting, not too different from normal white rice, but it had a subtle sweetness to it, I thought. And if the meal wasn't delicious enough, it was just beautiful! Enjoy!