Showing posts with label cooking. Show all posts

Friday, March 23, 2012

How-To: Boil Water


Hello again!  Remember me?  It just seems like my breaks between posts keep getting longer and longer, don't they?  But I promise I'll always return!

Anyway, we're down to 36 days until the wedding!  Can you freakin' believe it?!  Just yesterday, I could remember it being ages away (like 2 years away!).  And it's coming up quickly.  We pretty much have everything taken care of, just need to make the final payments on some things and we'll be good to go. 

I'm in between quarters at school (next quarter starts Monday - BAKING! - so expect a bunch of baked goods in the near future) and catching up on some spring cleaning, so I haven't done much cooking - especially since life is crazy busy!  I know the title of this post may deter some of you, I mean, hell... shouldn't we all know how to boil water?  Believe it or not, I've actually seen a lot of people that do this incorrectly!  Take my lovely other half, for instance.  I find him putting the pasta in the pot, covering it with water, and THEN putting it on the stove.  I can even admit that I'm guilty of this every now and then.  A lot of people think that it's faster to do it that way, but honestly - it just wastes more time! 

So this isn't necessarily a "how-to" per se, but more of a post of tips.  So let's get to it!

1. Starting with cold water, put enough water into a pot to cover whatever you'll end up boiling (i.e. pasta).  Bring water to a boil over high heat.  Add salt to season.


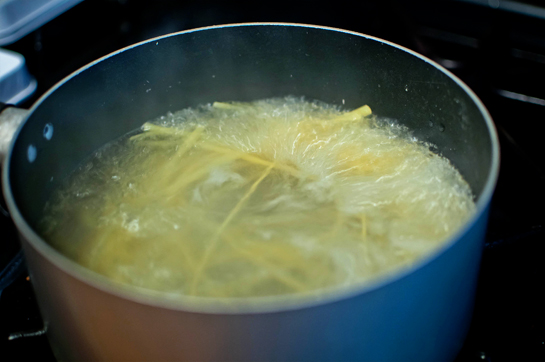
2. Add your desired food to the water (in my case, pasta).  The temperature will drop when you add the food, so you'll want to keep the heat on high to bring it back to a boil.  Then reduce the temperature, as needed, just to maintain a boil.


3. Cook the food until it reaches your desired texture/doneness.

You want to serve boiled food right away, unless you plan on shocking it after (placing in ice water). 


I know this may have seemed like a pointless post to some of you, but I've come to learn that the little things are what make your meals amazing.  Whether it be properly heating up a saute pan, bringing water to a full boil, or even something as simple as adding a pinch more salt to something.  It's the little things that don't get the credit, but it's also the little things that bring something from "meh" to "wow, what's your secret?!" 

Hope everyone has a great weekend!  I've got to work at the restaurant tonight, but I've got the whole weekend off.  Andy and I are planning on being lazy - but that never works out!  See you guys in a few days =)

Friday, August 7, 2009

Raspberry-Walnut Grilled Chicken Salad

We never have salad for dinner. But, to go along with our healthy eating, I figured why not. I've got to get that bikini body ready somehow and I've only got 1 more week until our vacation! I'm definitely in need of one considering I've taken two summer classes already and yesterday was my last day. It was a relief lifted off of my back to know that I got an A in both!

Anyway, got off on a little tangent there, but I was browsing some recipes and found this lovely cherry chicken salad recipe over at More Please.

I WAS going to use dried cranberries instead of cherries, but I forgot to save some cranberries from our cranberry-bacon fried rice the other day, that I just opted to do without the fruit because I was too lazy to go to the grocery. And a couple other tweaks also...

Ingredients:

2 Chicken Breasts
1 tablespoon strawberry jam
1/4 cup plus 1 tablespoon raspberry walnut vinaigrette
1/2 cup olive oil
1/4 cup lime juice
1/4 cup lemon juice
1 tablespoon shallot, minced
salt and pepper to taste
bag of spring mix
1/4 cup maple sage walnuts
1 cup walnuts
3 tablespoons syrup
1 teaspoon dried sage or 1 fresh sage leaf chopped finely
4 tablespoon goat cheese

Combine jam, 1 tablespoon raspberry walnut (or any fruity vinaigrette really), olive oil, lime juice, lemon juice, shallow, salt and pepper in medium sized bowl. Add chicken and mixture into plastic bag and let marinate for about 2-3 hours.

While chicken is marinating, you can make the maple sage walnuts. These were probably my favorite part of the salad. Such a good use of walnuts.

In a small skillet under medium heat, add walnuts, syrup, sage, and a pinch of salt and cook for about 3-4 minutes. Make sure syrup covers all of the walnuts and let cool. Easy huh??


When chicken is finished marinating, preheat oven to 400 degrees.

Heat medium sized oven proof skillet under medium to high heat and sear chicken until golden brown on both sides, about 3 minutes per side. (as an alternative to an oven proof skillet, you could always lay a baking sheet in the oven while it's preheating, and when done searing chicken on stove, add chicken to hot sheet pan). Then put skillet in oven and cook chicken for about 10 more minutes. The searing of the chicken on the stove first allows the chicken to be "sealed" with flavor, and in my experience, I've found this to make the chicken juicier while it's in the oven, not dried out.

When chicken is cooked through, allow it to rest for about 5 minutes.

Prepare even amounts of spring mix on two plates. Slice chicken and add on top of salad. Sprinkle walnuts, goat cheese, and if you want to some dried fruit (cranberries, strawberries, or cherries). Then drizzle vinaigrette over salad and serve!


This is definitely a delicious and light meal that's great on a hot summer day!

Wednesday, July 29, 2009

Spicy Green Beans & Shrimp

First of all, I want to thank anyone and everyone that voted for my eggplant dish in Foodie Fight's Battle #8: Eggplant/White Wine. Crossing my fingers that the results turn out in my favor, or at least that I kept up with the competition!

So, in the mean time, I figured I'd post this quick and delicious recipe for Spicy Green Beans & Shrimp that Andy and I had for dinner last week. Credit goes to Dishing Up Delight's blog who found the recipe from another blog, so I guess this is just a turning into a chain, so feel free to pass it along to the next guy. This is definitely something that can be fixed up on a weeknight and not feel guilty about eating it, because it's mucho healthy.

What You'll Need:

1 lb. green beans, trimmed and cut into 1 in. pieces
3 tblsp. olive oil, divided
1/2 tea. ground coriander
1/2 tea. ground cumin
1 tea. salt, divided
1 tea. freshly ground black pepper, divided
1/8 teaspoon Aleppo pepper (I used cayenne pepper)
3/4 lb. raw shrimp (peeled and deveined, I also left the tails on mine)
zest from 1 lemon (cut lemon into wedges as garnish for plating)


As far as the cooking, it goes by pretty quick.

Preheat oven to 450 degrees.

Toss the trimmed beans in 1 & 1/2 tablespoons olive oil, coriander, cumin, 1/2 teaspoon salt, 1/2 teaspoon black pepper, and cayenne pepper.


Toss shrimp in separate bowl with remaining 1 & 1/2 tablespoons olive oil, lemon zest, remaining 1/2 teaspoon salt, and remaining 1/2 teaspoon black pepper.


Spray sheet pan with non-stick cooking spray and lay down green beans in single layer. Roast in oven for about 10 minutes. Make sure to stir them up mid-way.

After 10 minutes, layer shrimp on top of beans and roast for about 5 more minutes, or until shrimp looks pink and juicy.


Squeeze lemon on top of shrimp and save wedge for garnish. Enjoy!


I couldn't believe how delicious this was. So simple, so fresh... sooooooo gooood.

Wednesday, July 22, 2009

Flank Steak Enchiladas with Tomatillo Green Sauce

Before anything, let me first say, that I am super stoked about being chosen to participate in this week's Foodie Fights: Battle Eggplant/Wine. This is definitely a tough one because I've only really used eggplant a few times in my culinary adventures, but with a little research I think I might be on to something. And the competition is fierce, kinda makes me feel like a little fish in a VERY huge and advanced pond. But more updates on that later...

I was checking out Food In My Beard's blog the other day and there was a recipe for flank steak enchiladas that I just had no reason not to try. For 1, we never cook mexican/spanish food at home. 2. i love flank steak. 3. after making avacado salsa verde a few weeks back, i fell in love with the tomatillo. So I just couldn't pass it up. For complete recipe check out the blog, there's always something delicious and entertaining there.

First things first, preheat oven to 450 degrees and roast 1lb cored tomatillos, 3 halved and seeded jalapenos (i didn't seed them all the way, because i like a little punch), and 2 halves of an onion. Drizzle with some olive oil and salt, then roast until they're a little brown on the edges, I think it took maybe 10-15 minutes.


After that, I let them cool for a little bit and then pulsed all the veggies in the blender. Depending on how you like it, you can make it chunky or smooth, but that's up to you. Add some garlic and cilantro and whatever else you might have laying around that sounds good. I was going to add some cream cheese, but forgot, so it never happened. But it turned out like this...


Had a little kick to it, that's for sure!

And instead of using 8 New Mexico dried chiles, I used about 4 because I had them on hand and didn't feel like buying more at the store. I then soaked those in about 2 &1/2 cups chicken stock and 2 & 1/2 cups water mixture under medium to high heat. I let them soak for maybe 20-25 minutes.

Next step was to blend the liquid and peppers in a blender. Since hot liquids in a blender don't really go together well, I let the mixture sit out for a little bit to cool. (an immersion blender could have solved this problem, but that's on my christmas list) Then, I put the chiles in first and blended those up first, added the slightly warm cooking liquid and just pulsed so it wouldn't all blow up. Worked well and had a minimal mess to clean up.

Set that mixture aside and get the flank steak out. Sear on both sides, I did mine for about 3 minutes each side, then set aside on cutting board/plate.

Chop up some onion and a few more jalapenos (once again, i left some seeds in) and cook in a pot for about 10 minutes. Add some garlic and cook for a couple minutes longer. Then bring back the pepper juice from the blender and mix in to pot. Add the flank steak. I grated a couple cloves in, pinch of cinnamon, tablespoon of cumin, and a shake or two of cayenne pepper. Then I covered pot and let sit on stove on low for about an hour and a half. About 45 minutes into it, add some diced potatoes.

I had some masa harina laying around and also made homemade tortillas just like Dan. Honestly, I've only just used it in tiny amounts to thicken things up - sauces, soups, etc. Never used it for it's actual intended purpose, to make tortillas. But it was really pretty easy though, just add water, basically. My tortillas didn't turn out quite as circular and perfect as Dan's did, but it was my first time and I was a tad bit clumsy. The authenticity and effort was there though.

Back to the steak and pepper mixture, take steak out with tongs and let sit on cutting board/plate a few minutes to cool. Then shred. I got tired of trying to shred thinly, so I ended up with half shred, 1/4 chunks, and 1/4 strips. Made for a good mix. Return shredded/chunked/stripped steak back to liquid and stir.

Put oven on broil. Fill tortillas with steak/potato mixture and fold in and place tortillas, crease side down in baking pan. I put shredded cheese in the tortilla first, then placed steak in. Add cheese on top of tortillas along with tomatillo sauce. Can put more cheese on if you wish. Place in oven and broil for about 5 minutes, until cheese is melted, and enjoy!

Everything was so tasty and great, thanks Dan for the idea!

Tuesday, July 14, 2009

Colombian Chicken Soup

So this is the first post. So I figured I'd start out with something light and refreshing. I posted on my Facebook status the other day that I was in the mood to make chicken soup. I got tons of responses asking me if I was sick. Why does wanting to make chicken soup have to mean you feel sick or ill? Hell, I just wanted it because it sounded good.

Well let's start out with what you need:

Short-Grain Brown Rice
Water
Salt
Skinless Chicken Breast
Scallions
Garlic Cloves
Ears of Corn
Cumin
Cilantro
Chicken Broth
Ground Black Pepper
Potatoes
Asparagus
Avocado
Fat-Free Yogurt
Capers


And On To The Action:

Personally, I like to get everything ready so I can just throw it all in and use it when it's called for. I Used to just prep as I went along, but I soon found out that it was a lot quicker to do the latter.

Anywho, put about 2/3 cups of the rice in a saucepan and put another water in to cover the rice. Bring to a boil, turn down the heat, cover the rice, and let it go for about 30 minutes or so, or until it tickles your fancy. When it's done, let it chill out without any heat for about 10 minutes, then salt it to your liking and let it be until it's needed.

Now for the magic, in a big pot, throw in the chicken breast(s) (the actual recipe calls for 1 skinless bone-in chicken breast, but I used 2 skinless boneless breasts instead because I had them on hand, you can do whatever), about 1/2 cup thinly sliced scallions (or green onions, whatever you wanna call 'em), 2 smashed cloves of garlic, 2 shucked and sliced ears of corn, 1/2 teaspoon of cumin, and some cilantro (actual recipe called for 1/2 cup, but Andy is sensitive to cilantro, sensitive meaning he's not too big of a fan, so I used about 1/4 cup to tone it down), and 8 cups of chicken broth (I took the easy way out and threw in 8 cups of water with 8 boullion cubes). Salt and pepper as you like and let boil, then simmer down low for about 12 minutes, or until your chicken no longer makes a peep. Take the chicken out of the pot and let rest until slightly cool, then shred it up. I did both thick and thin chunks, because I really like hearty pieces of chicken in my soup.

Then strain out the solids from the broth and discard everything except the corn (unless you don't like corn, you can throw it out, but why waste perfectly delicious corn, right?). Return the corn to the broth and bring that sucker to a boil again. Add about 1/2 lb. of cubed potatoes (I used red and peeled them, you can leave skin on if you like), and cook until just tender, 8 minutes. Then add 1/2 lb. chopped (1-inch thick) asparagus and heat for about 5 more minutes. Add chicken to pot, salt and pepper it up, and voila! You're done.


I "churched" it up a little and ladled the soup into the bowls, garnished the soup with some fresh cubed avocado, a spoon full of fat-free plain yogurt, a few capers (they add a punch that you don't expect), and a heaping spoonful of the brown rice.

Full recipe can be found here: Columbian Chicken Soup
Adapted from Food & Wine: May 2009 Recipe

And since soup clearly wasn't enough for Andy, his contribution was the grilled cheese...

... which I must say, was a good addition. There's nothing like dipping grilled cheese in soup =)